| Usage |
[If you are only using TinyKinoko and/or SmallKinoko, you may skip this section]
Each component is implimented as a single UNIX process, but has the following 4 special interfaces to operate with other components.
"Event"/"event slot" is a synchronous message exchange mechanism between components, and it is the equivalent of the call method. Which means that components can throw events to other components and the component that received them starts processing accordingly.
By using the import and export functions, components can share internal objects. For example, The logger, which is a component that records system logs, has an internal object "Logger Object" and exports this. Other components can import it and use it without treating it as an object of a differenct component.
The "registry" is a global parameter data base that manages parameters that do not belong to particular components. All components can browse it asynchronously.
In order to make a network transparent inter-component synchronous/asynchronous communication possible, an infrastructure that becomes the medium of component communication that also controls components is necessary. This is the KCOM framework. When the Kinoko system is booted, the KCOM manager process, which is the core of the KCOM framework, starts up. Then, the manager process runs service processes (brokers) on all computers used in the system and establishes communication routes with them. The brokers secure resources such as shared memory and message queue on those computers to prepare an environment that enables inter-component communication. When the infrastructure building is finished, the broker, through the instruction of the KCOM manager, starts the component process and makes the components connect to the communication environment it prepared. Inter-component communication is basically mediated by the broker and the manager.
Information regarding the KCOM framework, such as the kind of component to be booted, how many is needed, and the arrangement of the computers, is scripted by the KcomScript. Also connection of shared objects between different components are scripted here too. Events and slots of a component can be directly connected with another component, but this takes away the independence and functions as a single object of the component so normally, components are not directly connected to each other. Instead, component events can be acquired by the KcomScript, and event slots are called from the KcomScript too.
The following is an example of KcomScript. For details, read the KcomScript section.
 1: // import component definitions
 2: import KinokoController;
 3: import KinokoCollector;
 4: import KinokoLogger;
 5:
 6: // component declaration and distribution
 7: component KinokoController controller("localhost", "port: 10000");
 8: component KinokoCollector collector("daq01");
 9: component KinokoLogger logger("localhost");
10:
11: // assign shared objects
12: assign logger.logger => controller.logger;
13: assign logger.logger => collector.logger;
14:
15: // connect event/slot
16: on controller.start()
17: {
18:     collector.start();
19: }
20:
...(continues)
Normally, a private I/O channel is used for connections to the user interface. For example, the Controller component uses it to connect to the control panel, the Logger to the logger window, and the Viewer to the display window.
To keep Kinoko platform independent, the core (KinokoKernel) avoids the direct use of GUI which is strongly platform dependent. Instead, it connects to an outside user interface program by using the private I/O channel. Programs that connect to KinokoKernel through communication channels and works as user interfaces are called KinokoShells.
As of now, the following KinokoShells come as standard.
- kinoko-control
- Connects to the KinokoController component. Displays the control panel arranged with input fields and buttons and transmits user inputs. The design of the control panel is scripted by KCML script which uses XML.
- kinoko-board
- Connects to the KinokoLogger component. Receives text display commands from the component and displays them in an area within the window.
- kinoko-canvas
- Connects to the KinokoViewer component. Receives graphics display commands from the component and displays them in an area within the window.
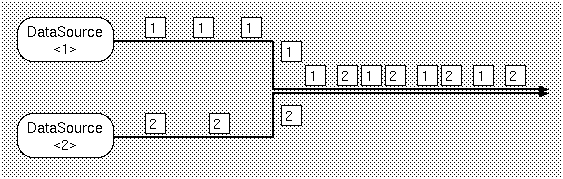
The transmitting of data packets is called data stream. The location that creates data packets, which becomes the starting point of the data stream, is called the data source in Kinoko. The Collector component which reads data out from hardware is a perfect example of a data source. In the Kinoko system, all data sources have unique names and also depending on the system gets assigned a unique DataSourceId.
In Kinoko, data streams can be combined or separated freely. When the streams are combined, the resulting stream has data packets from multiple data sources. To identify data packets that are intermixed in a data stream, all data packets have a DataSourceId recorded at the begining of their packets.
Stream pipes are components that receive data packets from data streams, performs some kind of data processing if necessary, and sends them out to lower ends of the data stream. Data processing components online is an example of this. Also, Kinoko has components that just sends them out without doing any processing. This component is called the KinokoTransporter.
Data buffers are special components inside a stream. It consists of shared memory and memory manager of UNIX, and as the name suggests, functions as a buffer inside the stream. Since it uses shared memory, it often works efficiently. Buffers have the following functions.
You must be careful that stream pipes only have one input stream and one output stream. Every time a stream is combined or divided, you must use a buffer. The following is an example of combining data streams from two data sources using a buffer and separating them into two different data streams.
The buffer is a passive component towards the stream in a sense that it distributes all packets it received to all output streams without processing anything to the data packets. It also cannot access over the network since it uses shared memory. If you want to access a buffer over the network, you must put in a transporter component on the buffer side of the computer (these specifications are planned to be changed in the future).
For stream source components, there is a slot "setSink()" that allows to specify where to connect to. Similarly, stream sink components have "setSource()" and stream pipes have "setSourceSink()." To connect components this way, both sides of the stream must specify where to connect to (so the source side as well as the sink side has to do "setSink()"/"setSource()")
Since a buffer is a passive component, the buffer itself does not have a slot to specify where to connect to. But in order to process connection requests, you must call "start()" first.
After setting connections for all components with "setSink()"/"setSource()," extablish connections by calling "connect()." The following is the KcomScript that connects streams as the configuration described above (Details will be explained in the KcomScript section).
void connect()
{
    buffer.start();

    collector1.setSink(buffer);
    collector2.setSink(buffer);
    recorder.setSource(buffer);
    analyzer.setSourceSink(buffer, viewer);
    viewer.setSource(analyzer);

    collector1.connect();
    collector2.connect();
    recorder.connect();
    analyzer.connect();
    viewer.connect();
}
When ending the system, call "disconnect()" to undo the stream connections.
void disconnect()
{
    collector1.disconnect();
    collector2.disconnect();
    recorder.disconnect();
    analyzer.disconnect();
    viewer.disconnect();
}
All data sections have unique section names within the datasource. Also, an identifier number called SectionId is assigned to each data section by the system. SectionIds are recorded on all section data in order to distinguish which data section it belongs to. SectionId is an unique number within the datasource, but there is a possibility that other data sections from different datasources have the same ID. By using both the DataSourceId and SectionId, a data section can be distinguished from the rest.
There are the following kinds of data section depending on the data format that section data possesses.
- indexed
- Data structure that can handle variable-length arrays. Section data is made up of variable element data, and each element data has a fixed-length address value and data value. It is used when data is composed of simple integers such as CAMAC's ADC. The following is an example of a indexed selection data.
0 123    -- element data  -+
1 234    -- element data   |  -- section data
2 213    -- element data  -+

0 312
1 231
2 312
- tagged
- Data structure that is compatible with fixed structures. Section data consists of a set number of element data that are named individually. Each element data has a fixed length of data values. This data section is used to emphasize the meaning of the element data themselves as opposed to the indexed type structured data. The following example is an example of a tagged section data.
pmt_0 123    -- element data  -+
pmt_1 234    -- element data   |  -- section data
pmt_2 213    -- element data  -+

pmt_0 312
pmt_1 231
pmt_2 312
- block
- Data structure that holds data blocks of unknown structure or no definite structure. Various sizes of datablocks can be held and the datasize is the only characteristic managed. Used for data such as ones from modules with internal buffer.
- nested
- Holds any number of data section of any section type. Nested sections are able to hold nested sections inside. By using nests, complicated data structures can be described.
Also in the data descriptor are datasource attributes, which are fields that can record "name/value" pairs. These are used to record information such as measurement parameters that are not recorded in the data themselves.
The following example is an example of a data descriptor. Don't worry too much about the details.
A simple example that uses CAMAC ADC and TDC
datasource "CamacAdcTdc"<1025>
{
    attribute creator = "KinokoCollectorCom";
    attribute creation_date = "2003-04-13 17:40:23 JST";
    attribute script_file = "CamacAdcTdc.kts";
    attribute script_file_fingerprint = "edddd900";

    section "adc"<256>: indexed(address: int-8bit, data: int-24bit);
    section "tdc"<257>: indexed(address: int-8bit, data: int-24bit);
}
An example of something more complicated
datasource "MyComplicatedMeasurement"<5>
{
    attribute creator = "KinokoCollectorCom";
    attribute creation_date = "2003-04-13 17:47:43 JST";
    attribute script_file = "MyComplicatedMeasurement.kts";
    attribute script_file_fingerprint = "5f36e1a0";
    attribute setup_version="1.0";

    section "event"<6>: nested {
        section "event_info"<3>: tagged {
            field "time_stamp": int-32bit;
            field "trigger_count": int-32bit;
        }
        section "adc"<4>: indexed(address: int-8bit, data: int-24bit);
        section "tdc"<5>: indexed(address: int-8bit, data: int-24bit);
    }

    section "hv_monitor"<7>: indexed(address: int-16bit, data: int-16bit);
}
The byte order becomes that of the computer that created the packet. Since the 16bit DataSourceIds are recorded in the first 32bitwords, byte orders can be identified by taking the bitAND of the first word value and 0x0000ffff.
On the other hand, since KDF is made for simple online data storage purposes, it does not handle things such as random accessing data in a file so well. Therefore, in experiments where many huge datafiles are involved, it is not appropriate to use KDF for data storage that is shared with offline analysis. In those kind of experiments, separate data storage systems specifically designed for that experiment are often prepared, so Kinoko assumes that a user component "Recorder" will be made by the user for that specific storage system.
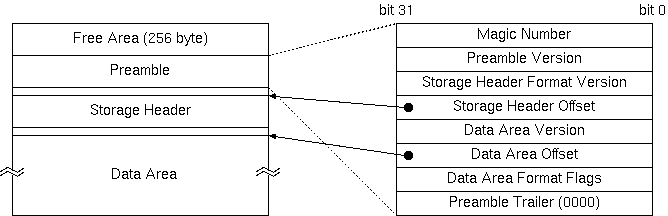
The first 256 bytes of the file is space that can be used freely and tools that read the KDF will ignore this part completely. Normally, a simple explanation of the KDF file is written in plain text, and when viewing the KDF file with cat, it will display messages that recommend kdfdump tools.
In the next preamble part, parameters regarding the datafiles themselves are recorded. For example, the file's magic number, the version of the data format, and file offset of the header and datablock follows. The version number consists of a 16bit major version and a 16 bit minor version, and for changes with downwards compatibility, only the minor version is changed. By this, when reading new data with an old program, it can handle the data correctly as far as it is compatible (if it is detected to be incompatible, an error will occur of course). Further more, by giving each block that consists a data file a version number, even if parts are incompatible, the compatible parts will still be read.
In the Storage Header, run parameters given externally are recorded in text format. The following is an example of a storage header.
[Header]
{
        Creator="KinokoRecorderCom";
        DateTime="2003-04-14 10:47:24 JST";
        UserName="sanshiro";
        Host="leno.awa.tohoku.ac.jp";
        Directory="/home/sanshiro/work/kinoko/local/test";
        RunName="test001";
        Comment="this is a test";
}
In the data area, data packets from the data stream are recorded without many modifications. However, since the packet size of the packet itself is not explicitly recorded, and since it is often better to know the size of the packet before reading them, right before each packet data the packet size is recorded in little endian's 4byte integer. The byte order inside the packet has to be determined by each packet since they originate from different data sources.
KDF is designed for online simple storage so the subfiles themselves do not have any specific strucutral meaning, and they are not meant to be read as single subfiles. There is some level of support however for the purposes such as debugging and on-site analysis.
KDF has a raw access mode that allows the access of the data packets directly, ignoring the preamble and storage header. Since some files do not have preambles, we are able to process the data normally through directly reading the data packet.
To identify packets, analyzing the DataSourceId and SecondId is necessary, but these values can be set in the readout script to a specific value. By doing so, distinguishing packets and acquiring data blocks become possible without reading the data descriptor.
Be aware that these techniques are all backdoor ways of getting
around, and they completely ignore Kinoko's functions such as error
checking and parameter managing.
Script Basics
In Kinoko, scripts are used to write system configurations, to
customize operations of components and so on. The syntax of the
scripting language used can be extended depending on its purpouse, but
the basics are all the same. Here, we discuss the basic part (KinokoScript).
For processors of KinokoScript, there are " kisc-script" and "kisc-interactive". "kisc-script" takes script file names as arguments and executes the whole file at once. "kisc-interactive" on the other hand shows prompts when executed, and runs interactively line by line. The following is an example of kisc-interactive.
If you pass a script file name as an argument on start-up when using kisc-interactive, it will execute the script first. If you type ".x filename" on prompt, you can execute external scripts.
% kisc-interactive
> println("hello, world.");   // println()
is a built-in function that displays the argument and starts a new line
hello, world.
> 1+2*3;             // only calculates 1+2*3 (no display of result)
> ? 1+2*3;           // in
kisc-interactive, put ? in front to display the result
7
> println(1+2*3);    // Of course you can use println() for display
7
> for (int i = 0; i < 3; i++) {
? println(i + ": hello");   // if the statement is not finished, the prompt becomes ?
? }
0: hello
1: hello
2: hello
> ^D              // Ctrl-d to end
%
The following is an example of how to use strings.
integers 0 123 0x123abc real numbers 3.14 1.23e10 1.23e+10 1.23e-10 strings "hello world" "123" lists { 1, 2, "hello" }
The following is an example of how to use lists.
// association by a + operator
println("hello" + " " + "world");   // --> hello world

// numbers are converted to strings when associated
println("pi = " + 3.1415);          // --> pi = 3.1415

// retrieving size by the sizeof operator
println(sizeof("hello world"));     // --> 11

// accessing as character array by the []operator
println("hello world"[6]);          // --> w
This is not literal, but making a list of regular integers and real numbers can be done easily by the list generating operator [].
// element access by the [] operator
println({123, 456, "hello"}[1]);   // --> 456

// operators between list mean element by element
println({1, 2, "hello"} + {3, 4, " world"});   // --> {4, 6, "hello world"}

// operation between a list and scalor. element by element as well.
println(2 * {0, 1, 2} + 1);   // --> {1, 3, 5}

// to combine lists, a special operator is used
println({1, 2} <+> {3, 4});   // --> {1, 2, 3, 4}

// set operation on lists
println({1, 2, 3, 4, 6, 12} <&> {1, 2, 4, 8, 16});   // --> { 1, 2, 4 }
println([0, 5]);       // --> { 0, 1, 2, 3, 4 }
println([0, 10, 2]);   // --> { 0, 2, 4, 6, 8 }
println([5, 0]);       // --> { 5, 4, 3, 2, 1 }
println([0, 5] ** 2);  // --> { 0, 1, 4, 9, 16 }
The following are examples of how to use variants.
int/long int and long are the same long type in the processing system float/double float and double are the same double type in the processing system string string list list pointer pointer variant holds arbitrary values void a special type that shows the value does not exist: only used for return type of a function
You can use variants without declaring it by typing $. The scope of this variable is always universal.
// give the variant an integer
variant a = 123;
println(typeof(a));   // --> int

// since "a" has an integer value, it adds with integers
println(a + 456);   // --> 579

// give the same variable a string
a = "123";
println(typeof(a));   // --> string

// this time, the addition is in string format
println(a + 456);   // --> 123456

//"a" can be a list too
a = { 123, "123" };
println(typeof(a));   // --> list
println(a + 456);     // --> { 579, "123456" }
a list can be accessed by using string keys instead of the normal integer index.
for ($i = 0; $i < 10; $i++) {
    $sum += $i;
}

// the following $sum is the same one as the one inside {}
println($sum);   // --> 45
list range;
range{"min"} = 0;
range{"max"} = 10;
println(range);         // --> { "min" => 0, "max" => 10 }
println(keys(range));   // --> { "min", "max" }
println(range{"max"});  // --> 10
The following operators are the same as in C/C++, but differ a little in behavior.
precedence level associativity symbol 2 postfix unary ++ -- 4 prefix unary + - ! ~ * & ++ -- delete 6 left to right * / % 8 left to right + - 10 left to right << >> 12 left to right < <= > >= 14 left to right == != 16 left to right & 18 left to right ^ 20 left to right | 22 left to right && 24 left to right || 26 right to left = += -= *= /= %=
The following original operators are added.
precedence level associativity symbol remarks 0 special new can give constructor arguments during array generation 4 prefix unary sizeof returns the length of an array, list, or string.
The exponential operator ** is a special operator instead of an dyadic one in order to make -3**2 produce -9.
precedence level associativity symbol action 0 special ** calculates exponentials 2 postfix unary ! calculates factorials 4 prefix unary keys returns the key list of the associative list 4 prefix unary typeof returns the type name of that value 4 prefix unary # generates an integer of the indicated bit 8 lefto to right <+> puts together lists or scalars to create a new list 15 left to right .. generates an integer of the bit of the indicated range 16 lefot to right <&> performs a set operation on the elements in that list 26 right to left <+>= adds a list or scalar to a list
The following statements are the same as in C/C++, but differ slightly in their behavier.
name syntax compound statements { statement list } null ; expression statements formula; if-statements if ( condition expression ) statement while-statements while ( condition expression) statement for-statement for (initializing statement; condition expression; equation) statement continue-statements continue; break-statements break; return-statements return equationopt;
The following statement does not exist in C/C++, but many scripting languages such as Perl have it.
name syntax remarks throw-statements throw equation; the equation argument cannot be omitted exception handling statements try statement catch(argument declaration) statement one catch clause per one try statement. If the exception object cannot be assigned to the argument of the catch clause, an error occurs. exception handling statements try statement catch statement catch clause argument can be omitted
name syntax action foreach-statement foreach (parameter declaration; list equation) statement repeats the statement as it puts each elements of a list to the parameter in order
There are other grammar elements that do not define the starting point of an execution but still get written in the same level as entries. Declaration of a global variable is one example of this. In KinokoScript, these are called meta-entries. Almost all meta-entries run automatically before certain entries are executed.
     OutputFile file("sine_table.dat");
     double pi = acos(-1);
     for (double x = 0; x < 2*pi; x += pi/100) {
         file.println(x + " " + sin(x));
     }
     InputFile file("source.cc");
     string line;
     int line_count = 1;

     while (line = file.getLine()) {
         println(line_count + ": " + line);
         line_count++;
     }
    // Use Formatter to format the output
    Formatter formatter;
    string line = formatter.put("pi=").setPrecision(10).put(3.14159265).flush();
    println(line);   //--> pi=3.14159265

    // Everything above can be put into one line
    println(Formatter().put("pi=").setPrecision(10).put(3.14159265).flush());
    // Use Scanner and extract values from input lines
    string line;
    double x, y, z;
    while (line = getln()) {
        Scanner scanner(line);
        if (scanner.get(x).get(y).get(z).good()) {
            ...
        }
    }

    // Easier way to write this
    string line;
    double x, y, z;
    while (line = getln()) {
        if (Scanner(line).get(x).get(y).get(z).good()) {
            ...
        }
    }
- float sin(float x) / list sin(list x)
- float cos(float x) / list cos(list x)
- float tan(float x) / list tan(list x)
- float asin(float x) / list asin(list x)
- float acos(float x) / list acos(list x)
- float atan(float x) / list atan(list x)
- float exp(float x) / list exp(list x)
- float log(float x) / list log(list x)
- float sqrt(float x) / list sqrt(list x)
- float abs(float x) / list abs(list x)
- float srand(int seed)
- float rand()
m/pattern/ performs a regular expression match to the left hand side value of the =~ operator, and returns a list of strings that qualified. The m part can be abbreviated. s/pattern/substitution string/ performs a regular expression match to the value in the left hand side of the =~ operator, and replaces the match with substitution string. If left side value of Operator =~ is the left hand value, the string after replacing is substituted.string =~ m/pattern/option string =~ s/pattern/substitution string/option
Characters that can be used for "option" are the following
g perform a global match i do NOT distinguish between capitalized and non-capitalized letters
Several examples are given as follows.
string text = "cosine";
if (text =~ m/sin/) {
    println("matches");
}
string text1 = "cosine";
list result1 = (text1 =~ m/(.+)(sin(.*))/);
println(result1);  // --> { "cosine", "co", "sine", "e" }

string text2 = "tangent";
list result2 = (text2 =~ m/(.+)(sin(.*))/);
println(result2);  // --> { }   (If there isn't a match found, returns a null list)
add the global match option and all strings are substituted
using sub-pattern within substitution string is not available yet
// "split" divides text into elements by patterns specified
string line = "022-(217)-6727";
list elements = split(line, /[-()]+/);
println(elements)   //  --> { "022", "217", "6727" }

// if no patterns are specified, text is divided by spaces (null strings)
string line2 = "hello kinoko world";
list elements2 = split(line2);
println(elements2)   //  --> { "hello", "kinoko", "world" }
{
    // create a database object and establish connection
    string driver_name = "PostgreSQL";
    string database_name = "E364";
    Database db(driver_name, database_name);

    //execute query
    string query = "select * from hv_table where hv > 2000";
    QueryResult* result = db.executeSql(query);

    // print fields
    int number_of_columns = result->numberOfColumns();
    for (int i = 0; i < number_of_columns; ++i) {
	print(result->fieldNameOf(i) + " ");
    }
    println();
    println("---");

    // pring data
    while (result->next()) {
	for (int i = 0; i < number_of_columns; ++i) {
	    print(result->get(i) + " ");
	}
	println();
    }

    // delete result object every time query is done
    delete result;
}
{
    Database db("PostgreSQL", "E346");

    // if the query result is 1 row 1 column, the value can be retrieved directly by getValueOf()
    for (int channel = 0; channel < 32; channel++) {
        string query = "select hv from hv_table where channel=" + channel;
        int hv = db.getValueOf(query);
    }
}
{
    Database db("PostgreSQL", "E346");

    // execute query and loop through resulting rows
    // field values can be directly accessed with "@field_name" while looping
    sql[db] "select channel hv from hv_table" {
	println(@channel + ": " + @hv);
    }
}
Readout scripts are executed only once during system run, and they construct readout sequences. A readout sequence is a structure of internal objects that describe the entire process of accessing the device and reading and writing data. Readout sequences are scripted when sequence initialization conditions are met, and during data acquisition executed everytime the condition is met. Be careful not to confuse script execution and sequence execution.
Declaring devices is done in the same syntax as declaring normal objects. There exist classes for each modules, controllers, and crates for VME, CAMAC and software, namely VmeModule/CamacModule/SoftwareModule, VmeController/CamacController, and VmeCrate/CamacCrate (The software module does not have controller and crate classes). For modules and controllers, the actual device driver (KinokoModuleDriver, KinokoControllerDriver) is passed as the first argument.
A list of module and controller drivers can be displayed with the command kinoko-lsmod.
datasource CamacAdc {
    CamacCrate camac_crate;
    CamacController camac_controller("Toyo-CC7x00");
    CamacModule adc("Rinei-RPC022");
    CamacModule tdc("Rinei-RPC060");

    VmeCrate vme_crate;
    VmeController vme_controller("SBS-620");
    VmeModule latch("SIS_3600");
    VmeModule interrupter("Rinei-RPV130");
Here the left of the colon is the driver and to the right is the module type and model. The drivers are usually written as "company_model." The underscores in writing the drivers can be replaced by hyphens in the script.
% kinoko-lsmod
VME Controllers:
    SBS_617:
    SBS_618:
    SBS_620:
    Kinoko_Vmedrv:
    Null:

CAMAC Controllers:
    Toyo_CC7x00:
    Hoshin_CCP:
    Kinoko_Camdrv:
    Null:

VME Modules:
    Generic_MemoryA16D16: VmeMemory (Generic_VmeMemory)
    Generic_MemoryA16D32: VmeMemory (Generic_VmeMemory)
    ... (continues)
    Hoshin_V004: VmeScaler (Hoshin_V004)
    Rinei_RPV130: VmeIORegister (Rinei_RPV130)
    Rinei_RPV160: VmeFADC (Rinei_RPV160)
    SIS_3600: VmeLatch (SIS_3600)
    SIS_3601: VmeOutputRegister (SIS_3601)
    SIS_3801: VmeScaler (SIS_3801)

CAMAC Modules:
    Generic_Standard: CamacModule (Generic_CamacModule)
    Rinei_RPC022: CamacQADC (Rinei_RPC022)
    Rinei_RPC060: CamacTDC (Rinei_RPC060)
    Rinei_RPC081: CamacFADC (Rinei_RPC081)
    ... (continues)
After declaring drivers to be used, we now script the connection between these devices. For CAMAC specify which module goes into which station, for VME set the base address and, if needed, IRQ and interrupt vectors. To do this we invoke the installController()/installModule() method of the VmeCrate/CamacCrate class.
To use an 8bit interrupt vector, fill the upper 8bit of the interrupt vector in installModule() with 0xff (0xf0 -> 0xfff0 etc).
    int station;
    camac_crate.installController(camac_controller);
    camac_crate.installModule(adc, station = 10);
    camac_crate.installModule(tdc, staion = 11);

    int address, irq, vector;
    vme_crate.installController(vme_controller);
    vme_crate.installModule(latch, address = 0x01000000);
    vme_crate.installModule(interrupter, address = 0x8000, irq = 3, vector = 0xfff0);
We are now ready to access the device.
"on" statements are used to script sequences and its execution conditions. Conditions are scripted at the top of an "on" statement, and sequence building statements follow.
There are 3 kinds of sequence execution conditions.
Sequence building statements follow the sequence execution condition. In the sequence building statements, individual actions (sequence actions) that compose the sequence are generated and added. Sequence actions are generated by calling special methods (sequence action generating method) that the module object has.
- trigger
- syntax: on trigger (device)
- sequence is executed on service request (more details to follow) from the device. Specific service requests depend on devices, but in general, if the device is CAMAC it is LAM, and for VME, an interrupt.
- trap
- syntax: on name of trap
- sequence is executed at special times such as start and end of a run. Traps defined currently are run_begin / run_end / run_suspend / run_resume.
- command
- syntax: on command (command name, parameter listopt)
- sequence is executed on external commands such as user control.
The following is an example of a readout script that reads data from the ADC in CAMAC and clears it. Here we use the sequence action methods read() and clear() of the CamacModule class to generate READ and CLEAR actions and add them in the sequence.
The sequence generated by this script can be displayed with command ktscheck (Don't worry too much about details).
datasource CamacAdc
{
    CamacCrate crate;
    CamacController controller("Toyo-CC7x00");
    CamacModule adc("Rinei-RPC022");

    crate.installController(controller);
    crate.installModule(adc, 10);

    on trigger(adc) {         // sequence is executed upon ADC LAM
    adc.read(#0..#3);     // generate a sequence action that reads out ADC channels 0 and 3
    adc.clear();          // gererate a sequence action that clears the ADC
    }
}
The following is an example of reading out 4 "adc"s and clearing it upon trigger from input_register. In order to emphasize the relationship between the execution of the script and the sequence built, the script is written in a relatively complex manner.
% ktscheck --show-sequence CamacAdc.kts
trigger 2:
        .sequence
        ->      SingleRead      adc, 0:1:2:3
        ->      CommonControl   adc, CLEAR
        .end
The sequence built from this script is the following.
// a list of ADCs to be read out
list adc_list = { &adc0, &adc1, &adc2, &adc3 };

on trigger (input_register) {
    for (int i = 0; i < sizeof(adc_list); i++) {
        adc_list[i]->read(#0..#3);
        adc_list[i]->clear();
    }
}
Be aware that a loop is expanded upon script execution. Now, the sequence generated from the script above is technically the same as the sequence generated from the script below.
% ktscheck --show-sequence foo.kts
trigger 2:
        .sequence
        ->      SingleRead      adc0, 0:1:2:3
        ->      CommonControl   adc0, CLEAR
        ->      SingleRead      adc1, 0:1:2:3
        ->      CommonControl   adc1, CLEAR
        ->      SingleRead      adc2, 0:1:2:3
        ->      CommonControl   adc2, CLEAR
        ->      SingleRead      adc3, 0:1:2:3
        ->      CommonControl   adc3, CLEAR
        .end
Therefore, there is absolutely no difference in overhead when executing the script written as the preceding.
on trigger (input_register) {
    adc0.read(0x000f);
    adc0.clear();
    adc1.read(0x000f);
    adc1.clear();
    adc2.read(0x000f);
    adc2.clear();
    adc3.read(0x000f);
    adc3.clear();
}
On the other hand, the following script will not work the same.
The script above is technically the same as the following (the "script" is only executed once so the condition for the if statement is not met).
int count = 0;
on trigger(input_register) {
    count++;
    if (count > 1000) {
        scaler.read(#0);
        scaler.clear();
        count = 0;
    }
}
If you want to reference the value of the variable during sequence execution, you need to use the sequence register like the following. For more details, refer to the sequence register section.
on trigger(input_register) {
    ;
}
The sequence from this script will look like the following.
Register count;
on trigger(input_register) {
    count.add(1);
    when (count > 1000) {
        scaler.read(#0);
        scaler.clear();
        count.load(0);
    }
}
% ktscheck --show-sequence foo.kts

trigger 2:
        .sequence
        ->      OperateRegister [0x861a348], 1, ADD
        ->      .sequence conditional ([0x861a348] > 3e8)
        ->      ->      SingleRead      scaler, 0
        ->      ->      CommonControl   scaler, CLEAR
        ->      ->      OperateRegister [0x861a348], 0, LOAD
        ->      .end
        .end
Aside from the methods mentioned above, an user can define original action generating methods for specific modules. For details please refer to specifications in the KinokoModuleDriver of each module.
- read(ChannelList channel_list) / read(int channel_bits)
- Reads out data from the channels in the argument one word at a time and sends it out to the datastream as indexed type data. Used for simple ADC, TDC and scalar.
- tagRead(ChannelList channel_list)
- Reads out data from the channels in the argument one word at a time and sends it out to the datastream as tagged type data using the tag specified in ChannelList.
- sequentialRead(ChannelList channel_list) / sequentialRead(int channel_bits)
- Reads out multiple word data from the channels in the argument and sends it out to the datastream as indexed type data. The number of words read out at a time depends on the module. Used in FADC, multihit TDC, etc.
- blockRead() / blockRead(int address) / blockRead(int address, int size)
- Reads out datablocks from modules and sends them out to the datastream as block type data. Suitable for modules with FIFO and buffers.
- clear() / clear(int channel)
- Clears data inside modules. Behavior depends heavily on module.
- enable() / enable(int channel)
- Enables modules or channels of modules specified. Behavior depends heavily on module.
- disable() / disable(int channel)
- Disables modules or channels of modules specified. Behavior depends heavily on module.
- writeRegister(int address, Register register)
- Writes in values for addresses of modules specified.
- readRegister(int address, Register register)
- Reads out the value of the address specified of the module and store the register in the argument.
- waitData()
- Stops the sequence until data on the module becomes usable.
For CamacController, there are the following action generating methods.
- initialize()
- issue Z to CAMAC crate
- clear()
- issue C to CAMAC crate
- setInhibition()
- set CAMAC crate setting to I
- releaseInhibition()
- clear I of CAMAC crate setting
For CamacModule, there are the following action generating methods.
- transact(int F, int A)
- execute CAMAC action at the specified F and A
- transact(int F, int A, int data)
- transact(int F, int A, Register data)
- execute CAMAC action at specified F, A and data. If "data" is a sequence register, rewrite the result to data.
- transact(int F, int A, int data, Register Q, Register X)
- transact(int F, int A, Register data, Register Q, Register X)
- execute CAMAC action at specified F, A, and data, and return to the argument Q, X register the Q and X response.
The KinokoModuleDriver for each of these modules have service requesters implemented. A service requester is a mechanism that transmits requests from the module to the system. They have a couple of interfaces depending on the format of request such as interrupt or flag.
Which of these interfaces are implemented on a certain module or controller depends on the kinds of functions it has.
- WaitForSeriveceRequest()
- blocks execution until there is a service request or until a specified length of time passes
- IsRequestingService()
- sees if there is a service request
- EnableSignalOnServiceRequest()
- sets so that a signal is issued when service is requested
KiNOKO automatically decides the appropriate handling scheme from the following depending on such factors as the number of service requesters connected and the kind of interface implemented.
If there is only 1 "on trigger" within the datasource, the default is single trigger source. For 2 or more "on trigger"s, if all the service requesters support the issuance of a signal then signal interrupt & polling will be chosen, and if not, polling loop will. Be aware that depending on the handling scheme, the performance and the speed of communicating an interrupt will vary greatly.
- single trigger source
- calls WaitForServiceRequest()
- polling loop
- calls IsRequestingService() on each device with set intervals (1ms).
- ??????????
- signal interupt & polling
- calls EnableSinalOnServiceRequest() and waits for the signal. performs polling when the signal arrives or after a certain amount of time (1sec)
We list here service requester interfaces that are available for certain pairs of ?controller/modules, and device drivers?.
- VME module + vmedrv
- If the module supports VME interrupts, WaitForServiceRequest() waits for PCI interrupts converted from VME interrupts inside the driver.
- If the module supports VME interrupts, signal interrupts can be used.
- The implementation of IsRequestingService() is module dependent. Normally, it can be implemented.
- CAMAC module + camdrv (Toyo CC/7x00)
- WaitForServiceRequest() waits for PCI interrupts converted from LAM inside the driver.
- IsRequestingService() executes TestLAM (F8) and checks the Q response.
- Signal interrupt cannot be used (at the moment).
- CAMAC module + camdrv (Hoshin CCP)
- WaitForServiceRequest() executes a loop inside the driver that waits for LAM signals.
- IsRequestingService() executes TestLAM (F8) and checks the Q response.
- Signal interrupt cannot be used.
- Software module
- WaitForServiceRequest() will let the process sleep with interval timer until the conditions are met.
- The implementation of IsRequestingService() is module dependent. Normally usable in different timers (IntervalTimer, Oneshot Timer, etc).
- Signal interrupt cannot be used.
Operators that can be used on registers are the following.
Register reg;

on run_begin {
    reg.load(0);
}

on trigger(timer) {
    reg.add(1);
    output_register.writeRegister(address = 0, reg);
}
Also for script debugging purposes, there is a "dump" action that displays the value of the register.
- load(int value) / load(Register register)
- assign the value of the argument to the register
- add(int value) / add(Register register)
- assign to the register the sum of the current value and the value of the argument
- subtract(int value) / subtract(Register register)
- assign to the register the difference of the current value and the value of the argument
- multiple(int value) / multiple(Register register)
- assign to the register the product of the current value and the value of the argument
- divide(int value) / divide(Register register)
- assign to the register the quotient of the current value and the value of the argument
- modulo(int value) / modulo(Register register)
- assign to the register the modulo of the current value and the value of the argument
If you run this script using tinykinoko, it will interfere with the display of the progress bar and such and distort the display, so use the --quiet (or the -q) option.
datasouce RegisterTest {
    SoftwareModule timer("IntervalTimer");
    Register trigger_count;

    on trigger(timer) {
        trigger_count.add(1);
        trigger_count.dump()
    }
}
Relational operators that can be operated on registers (register relational operators) are the following. The meaning and precedence level of the relational operators are of the standard kind, but the left hand side must be a register, and the right hand side an integer. Also the retrun type is a special "register bool type." Values for these types only hold meaning in a when statement condition expression.
Register reg;
on trigger(input_register) {
    input_register.readRegister(address = 0, reg);
    when (reg == 0x0001) {
        adc_01.read();
    }
    when (reg == 0x0002) {
        adc_02.read();
    }
}
Further more, the following boolean operations can be performed on register bools. The return type is also "register bool type" (you may nest them together).
- register == value
- returns true when the register value equals the "value"
- register != value
- returns true when the register value does not equal the "value"
- register < valeue
- returns true when the register value is less than the "value"
- register <= value
- returns true when the register value is less than or equal to the "value"
- register > value
- returns true when the register value is greater than than the "value"
- register >= value
- returns true when the register value is greater than or equal to the "value"
- register & value
- returns true when the bit-and of the register value and the "value" is not 0
- register ^ value
- returns true when the bit-xor of the register value and the "value" is not 0
- ! register_bool
- logical NOT: returns true when the register_bool value is false
- register_bool && register_bool
- AND: returns true when both the left hand side and the right hand side are true
- register_bool || register_bool
- OR: returns true if either the left hand side or the right hand side is true
DataRecord run_header_record;
DataRecord event_count_record;
Register event_count;

on run_begin {
    discriminator.writeRegister(address = 0, threshold_00);
    discriminator.writeRegister(address = 1, threshold_01);

    run_header_record.fill("Threshold-00", threshold_00);
    run_header_record.fill("Threshold-01", threshold_01);
    run_header_record.send();

    event_count.load(0);
}

on trigger(adc) {
    adc.read(#0..#3);

    event_count.add(1)();
    event_count_record.fill("EventCount", event_count);
    event_count_record.send();
}
[This function cannot be used in TinyKinoko and SmallKinoko]
To execute sequences on external events such as KCOM events, you must use the "on command" statement. "on command" statements take parameters. The first parameter is the event name and then arguments come after that if needed. The arguments must be registers already declared.Also, users can use "invoke" statements to issue external events such as KCOM events.
Register threshold;
on command("setThreshold", threshold) {
    discriminator.writeRegister(address = 0, threshold);
}
on trigger(adc) {
    adc.read(#0..#3);

    Register event_count;
    event_count.add(1);
    when (event_count > 100) {
        invoke clear();
        event_count.load(0);
    }
}
read variable upon script execution
read register upon sequence execution
string run_type = getRegistry("control/run_type");
if (run_type == "calibration") {
    on run_begin {
        pulser.start();
    }
}
on run_begin {
    Register threshold;
    readRegistry("control/threshold", threshold);
    discriminator.setThreshold(threshold);
}
Register time;
DataRecord event_info;

on trigger(adc) {
    readTime(time);
    adc.read(channel_list);
    event_info.fill("time", time);
    event_info.send();
}
To assign datasource IDs, use "<>" to bracket the ID you want to assign to the datasource right after a datasource entry. To assign section IDs, indicate as an argument along with section name in the constructor of the module object that the data will be read out with.
If there are no user specifications, KiNOKO automatically assigns datasource IDs values greater or equal to 1024 and section ID values greater or equal to 256. When manually assigning values, please use values less than these. Do not use 0 as an ID since it holds special meanings.
datasource CamacAdc<3>
{
    CamacCrate crate;
    CamacController controller("Toyo-CC7x00");
    CamacModule adc("Rinei-RPC022", "adc", 7);

    crate.installController(controller);
    crate.installModule(adc, 2);

    on trigger(adc) {
	adc.read(#0..#15);
	adc.clear();
    }
}
As with the datasource, a user can assign section ID using "<>" after the section name.
on trigger(adc) {
    unit event {
        adc.read(#0..#3);
        tdc.read(#0..#3);
    }
}
unit event<12> {
datasource CamacAdc
{
    attribute setup_version = "1.0";

    CamacCrate crate;
    CamacController controller("Toyo-CC7x00");
    CamacModule adc("Rinei-RPC022");

    crate.installController(controller);
    crate.installModule(adc, 2);

    on trigger(adc) {
	adc.read(#0..#15);
	adc.clear();
    }
}
A view script is a script that is used to build internal object structures (analysis sequences and view sequences), such as discribing order of data processing and histogram displaying, and used in KinokoViewer. Aside from basic scripts, the following are added to the view script.
If the system in use only has one datasource (for example, if you are using SmallKinoko), an user does not have to script in the datasource like the following. If there are multiple datasources, and if the datasource name is omitted, no specific datasource data will be processed.
    Histogram histogram_adc_01("ADC ch 01", 256, 0, 4096);

    // fill histogram with data from datasource CamacAdc
    analysis ("CamacAdc") {
        DataElement adc_01("adc", 1);
        histogram_adc_01.fill(adc_01);
    }
    Histogram histogram_adc_01("ADC ch 01", 256, 0, 4096);

    analysis {
        DataElement adc_01("adc", 1);
        histogram_adc_01.fill(adc_01);
    }
The following scripts are examples of view sequences.
- on every (time sec)
- sequence is executed on every interval of time indicated in time
- on construct / on destruct
- sequence is executed proceeding system construction or preceding system destruction
- on run_begin / on run_end
- sequence is executed receding start of a run or proceeding the stopping of a run
- on clear
- sequence is executed proceeding the clearing of viewer display
    // draw histogram every 1 sec on display
    on every(1 sec) {
        histogram_adc_01.draw();
    }

    // save histogram after stopping a run
    PlainTextViewRepository repository("foo");
    on run_end {
        histogram_adc_01.save(repository);
    }
According to the data section type that is specified (indexed, ...), there are several constructors as the following.
    Histogram histogram_adc_01("ADC ch 01", 256, 0, 4096);

    analysis {
        // specify section name "adc", address 1
        DataElement adc_01("adc", 1);

        // fill histogram using data element
        histogram_adc_01.fill(adc_01);
    }
Further more, simple operations can be performed to data using DataElement. These operations use the following methods.
    // data element in indexed type section "adc" address 1
    DataElement adc_01("adc", 1);

    // data element in taggged type section "monitor" tag "high_gain"
    DataElement monitor_high("monitor", "high_gain");

    // data element in nested type section "pmt"
    which has indexed type section "adc" address 1
    DataElement pmtadc_01("pmt:adc", 1);

    // section "adc" all data elements
    DataElement adc("adc");
- setOffset(float offset)
- add an offset to the data value
- setFactor(float factor)
- multiply the data value by a coefficient
To feed data to these view objects, an analysis sequence must be built with data read action. The following two analysis sequence action generating methods are for the view objects above.
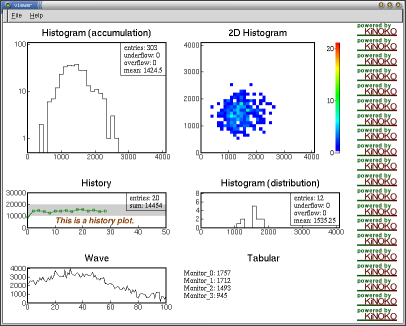
- Histogram
- histogram with one variable
- Histogram2d
- histogram with 2 variable. Displayed in such forms as Scatter/Color/Box on a flat plane.
- History
- in view of time variation. Displays such things as number of data received and calculated sum, mean, and variance of all data that was received. Used for statistically significant values (extensive variables) such as trigger rate, and also for continuous variation monitoring values (intensive variables) such as HV values and temperature.
- Wave
- datavalue form of a certain index for which the data consists of multiple data elements; in FDAC, data that is for one event of one channel (address) consists of multiple data elements, and this form will be a waveform.
- Map
- datavalue of each channel when one event consists of multiple channel data. A circle is drawn with corresponding color with data values at a position the user indecates. For example, if an user wants to position these as it corresponds to electronic circuit channels, it can show activity of each channel by colors.
- Tabular
- text display of data. If the data element has "names" associated to it such as in tagged format, it will be displayed as "name:value."
- Picture
- displays fixed characters, diagrams, images, etc. Has nothing to do with data display.
Depending on the view object, only one of the methods above would be performable. For example, "History" view considers time variation so the method fillOne() will not hold any meaning. On the other hand, it would not make sense to fill() a "Tabular" since all the data that is fed until clear() is performed would be held, and this would consume enormous amounts of memory as well as overflow rows when displaying data.
- fill(DataElement data_element)
- read data from the indicated data element automatically
- fillOne(DataElement data_element)
- read one event worth data from the indicated data element if the view object is not holding data (to unhold data, use the clear() generated action in view sequence)
View objects that was fed data in analysis sequences are able display it on screen and save it on file in view sequences. Also, the method clear() that releases all data held and allows fillOne() to feed data is a view sequence action. The following are view sequence action generating methods that all the view objects above have.
In almost all view objects, the following standard methods can be used too as well as the sequence action generating methods mentioned above.
- draw()
- draw data that the object is holding on display
- clear()
- clear data the object is holding
- save(ViewRepository repository)
- save data the object is holding to repository(such as files)
Be aware that these are standard methods, and will only be executed once upon script execution (system construction).
- setYScaleLog() / setYScaleLinear()
- set Y axis to log/linear scale
- setColor() / setFont() / setTextAdjustment()
- set properties for drawing display elements
- putLine(float x0, float y0, float x1, float y1)
- putRectangle(float x0, float y0, float x1, float y1)
- putCircle(float x, float y, float radius)
- putText(float x, float y, string text)
- draw display objects such as lines and text in the view display region. The coordinate system used is the view object's (not the screen coordinates). Circles are made into ovals depending on the x-y ratio.
- putImage(float x, float y, string file_name)
- read images from files and place them in the display regions in view. The coordinate system used is the view object's (not the screen coordinates). The only format displayable for now is XPM.
Details of each view object will follow.
    Histogram histogram("ADC ch 0", 256, 0, 4096);

    analysis {
        DataElement adc00("adc", 0);
        histogram.fill(adc00);
    }

    on every(1sec) {
        histogram.draw();
    }
Both fill() and fillOne() can be used in Histogram. If fillOne() is used with data elements that have multiple channels, a distribution map of data values for each event can be made (such as distribution of hit time of all channels for each event).
- Histogram(string title, int nbins, float min, float max)
- constructor. Binning also done inside argument.
    Histogram2d histogram("TDC v.s. ADC", 256, 0, 4096, 256, 0, 4096);

    analysis {
        DataElement adc00("adc", 0);
        DataElement tdc00("tdc", 0);
        histogram.fill(adc00, tdc00);
    }

    on every(1 sec) {
        histogram.draw();
    }
Both fill() and fillOne() can be used in Histogram2d just like Histogram.
- Histogram2d(string title, int x_nbins, float x_min, float x_max, int y_nbins, float y_min, float y_max)
- constructor. settings of bins is done in the argument.
- void fill(DataElement data_element_x, DataElement data_element_y)
- void fillOne(DataElement data_element_x, DataElement data_element_y)
- Analysis sequence action generating method that reads data. The argument sent to fill() in Histogram2d takes two "DataElement"s.
- void draw(string type = "color")
- Set drawing format in argument "type." Valid "type"s are the following for now.
- color: use colors to display value
- scatter: draw multiple dots corresponding to the value in each bin
- box: draw rectangles with area that correspond to the value
    History history("Trigger Rate", 1024, 0, 100);

    analysis {
        DataElement adc00("adc", 0);
        history.fill(adc00);
    }

    on run_begin {
        history.setOperationRange(10, 30);
        history.enableAlarm("trigger rate out of range")
    }

    on every(1 sec) {
        history.drawCounts();
    }
setOperationRange(), enableAlarm(), and disableAlarm() are view sequence actions. Varying the range and abling/disabling the alarm can be done inside the view sequence.
- History(string title, int depth, float min, float max)
- constructor. "depth" is the mazimum samples it can hold. "min" and "max" correspond to the range of the Y axis.
- void hold()
- calculates the sample values from all the data it received so far and stores them. Sample values consist of data points, sum, mean, and variance. If hold() is not called for a certain History, it is called automatically before draw().
- void draw()
- void drawCounts() / void drawSum() / void drawMean() / drawDeviation()
- draws a sample being held.
- void setOperationRange(float lower_bound, float upper_bound)
- sets ranges to be considered the operation range. This range is drawn in in the History plot, and if enableAlarm() is set, generates an alarm when the value goes beyond this range.
- void enableAlarm(string message)
- issues an alarm event when the data value is beyond the operational range set by setOperationRange(). In the KCOM framework, this is a KCOM event of "alarm(string message)" format. The message is the "message" argument passed to the of the enableAlarm().
Alarm events are only issued when data value crosses the operational range and will not be repeated when it continues to move outside the range. (if the value goes back and forth accross the boundary, it will continue to alarm. possible hysterisis is in need?)
- void disableAlarm()
- suppresses alarm issuance
fillOne() cannot be used in History.
    Wave wave_latched("FADC Waveform (Latched)", 0, 4096, 0, 1024);
    Wave wave_averaged("FADC Waveform (Averaged)", 0, 4096, 0, 1024);

    analysis {
        DataElement fadc00("fadc", 0);
        wave_latched.fillOne(fadc00);
        wave_averaged.fill(fadc00);
    }

    on every(3 sec) {
        wave_latched.draw();
        wave_averaged.draw();
        wave_latched.clear();
    }

    on every (10 sec) {
        wave_averaged.clear();
    }
Both fill() and fillOne() can be used in Wave. If new data is filled without being cleared, the data held becomes the mean of each sample. Therefore, if fillOne() is used, one waveform is displayed, and if fill() is used, a waveform that is averaged will be displayed.
- Wave(string title, float x0, float x1, float y0, float y1)
- constructor. x0, x1 define the range of x axis and are data index values. y0, y1 are for the y axis and are data values. To display all data from a 10bit 4ksample FADC, the constructor should have (x0, x1, y0, y1) = (0, 4096, 0, 1024).
    Map map("ADC hit map", 0, 1, 0, 16, 0, 4096);

    for (int ch = 0; ch < 16; ch++) {
        map.addPoint(ch, 0.5, ch + 0.5);
    }
    map.setPointSize(3);

    analysis {
        DataElement adc("adc");
        map.fillOne(adc);
    }

    on every(1 sec) {
        map.draw();
        map.clear();
    }
fill() cannot be used in Map.
- Map(string title, float x0, float x1, float y0, float y1, float z0, float z1)
- constructor. Points x0, x1, y0, y1 are coordinates that set where the map should be drawn. Points z0, z1 are data value display ranges.
- void addPoint(int address, float x, float y)
- displays data with data address "address" at position (x, y).
- void setPointSize(float point_radius)
- sets the size of the point that displays data.
    Tabular tabular("Laser Intensity Monitor");

    analysis {
        DataElement monitor("monitor_adc");
        tabular.fillOne(monitor);
    }

    on every(1 sec) {
        tabular.draw();
        tabular.clear();
    }
fill() cannot be used in Tabular.
- Tabular(string title, int number_of_columns = 1)
- contructor. Divides region by the number of columns indicated.
    Picture picture;

    picture.putImage(0, 0, "KinokoLogo.xpm");

    on clear {
        picture.draw();
    }
Picture is a special view object that only has display areas within a frame, and it cannot be filled with data. It is meant for putting pictures and text by putImage(). When displaying a file image, it takes a long time to draw(), so it is recommended that the draw() action be called inside "on clear()" sequences rather than on "every()" sequences.
- Picture()
- Picture(string title)
- Picture(string title, float x0, float x1, flaot y0, float y1)
- constructor. Sets coordinates by passing arguments. If a user does not want to specify, use (0, 1, 0, 1).
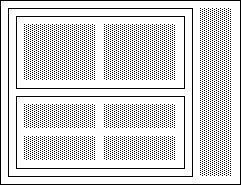
Since the layout object is a view object itself, it is possible to put layout objects within layout objects. By using the Grid and Placer appropriately, complicated layouts can be made rather easily.
The canvas has one grid called root grid, and places view objects that are not placed in any of the layout object automatically in this grid. If a user makes one layout object and places all the view objects in this layout object, the layout object itself will be placed in this root grid.
The following is an example of using multiple layout objects. A Placer is placed inside the root grid, and inside that a grid with 1 column, and two grids inside that grid. The image on the right side was placed in the Placer by directly indicating the coordinates.
    Placer placer(0, 1.2, 0, 1);
    Grid grid(1);
    Grid grid_upper(2);
    Grid grid_lower(2);

    placer.put(grid, 0, 1, 0, 1);
    grid.put(grid_upper);
    grid.put(grid_lower);

    grid_upper.put(histogram_adc00);
    grid_upper.put(histogram_2d);

    grid_lower.put(history_adc01);
    grid_lower.put(histogram_adc);
    grid_lower.put(wave_fadc00);
    grid_lower.put(tabular_adc);

    placer.put(picture, 1, 1.2, 0, 1);
View repositories are not suited for saving huge data fast. Data should be saved to data files (data storage), and view repository should only be used when saving pictures of remarkable events or to save pictures periodically.
[This function cannot be used in TinyKinoko, SmallKinoko]
To execute view sequences by external events such as KCOM events, an "on command" statement is used. "on command" takes event names as arguments.By using "invoke" statements within analysis sequences, external events such as KCOM events can be issued as well.
on command("initialize") {
    histogram.clear();
}
analysis {
    DataElement trigger_rate("scaler", 0);
    when (trigger_rage > 1000) {
        invoke tooHighTriggerRate();
    }
}
Functions that access registry upon sequence execution are not implemented as of now.
double nbins = getRegistry("control/histogram_nbins");
double min = getRegistry("control/histogram_min");
double max = getRegistry("control/histogram_max");

Histogram histogram("histogram", nbins, min, max);
[If you are only using TinyKinoko and/or SmallKinoko, you may skip this section]
The component distribution/connection script (or the KCOM script) is a script that tells Kinoko's system process (kcom-manager) the distribution of components that compose the system onto specific computers, the connection of component events/slots, the assignment of shared objects, and so on. Aside from basic scripts, the following are added to the KCOM script.
Unlike readout scripts and view objects, KCOM scripts act as normal interpreters (they do not use sequences). Therefore, all variables and expressions are evaluated everytime the script is executed.
The following operations can be done through KCOM scripts.
The general structure of KCOM scripts is shown below.
// retrieving component definition
import component_type_name;

// declaration and distributing components
component component_type_name
component_name("host_name", "input/output_channel");

// assigning shared objects
assign component_name.object_name => component_name.object_name;

on startup()
{
    // startup process
}

on shutdown()
{
    // shutdown process
}

// event/slot connecting
on component_name.event_name(event_argument)
{
    component_name.event_name(event_argument);
}
Here "emits" is used to declar an event issued by this component, and "accepts" is used to declar an event that this component is able to receive. "property" declares parameters that can be looked up externally (property). "uses" is the external objects necessary for this component, and these must be supplied by components that make up the system. In this example, an object of class KinokoLogger is necessary.
% KinokoCollector-kcom
//
// KinokoCollectorCom.kidl
//
// Kinoko Data-Stream Component
// Collector: DAQ front-end process
//
// Author: Enomoto Sanshiro
// Date: 22 January 2002
// Version: 1.0

component KinokoCollectorCom {
    property string host;
    property string stream_type;
    property string state;
    property int port_number;
    uses KinokoLogger logger;
    emits dataAcquisitionFinished();
    accepts setSource();
    accepts setSink();
    accepts setSourceSink();
    accepts connect();
    accepts construct();
    accepts destruct();
    accepts disconnect();
    accepts halt();
    accepts quit();
    accepts start();
    accepts stop();
    accepts setReadoutScript(string file_name, string datasource_name);
    accepts setMaxEventCounts(int number_of_events);
    accepts setRunLength(int run_length_sec);
    accepts executeCommand(string command_name, int parameter);
    accepts disable();
}

%
Within Kinoko's standard components, Kinoko Logger component is the component that supplies KinokoLogger class objects. The following is a display of KinokoLogger component's interface definition. Inside, KinokoLogger class object "logger" is listed under "provides" which means it is declaring it as a public object that other components can browse.
% KinokoLogger-kcom
//
// KinokoLoggerCom.kidl
//
// Kinoko System Component
// Logger: Logbook Writer
//
// Author: Enomoto Sanshiro
// Date: 22 January 2002
// Version: 1.0

component KinokoLoggerCom {
    property string host;
    provides KinokoLogger logger;
    emits processRemarkable(string message);
    emits processWarning(string message);
    emits processError(string message);
    emits processPanic(string message);
    accepts quit();
    accepts startLogging(string file_name);
    accepts writeDebug(string message);
    accepts writeNotice(string message);
    accepts writeRemarkable(string message);
    accepts writeWarning(string message);
    accepts writeError(string message);
    accepts writePanic(string message);
}

%
Input widgets are given names and those names allow other components of the system to look up the value of the widgets. Action widgets on the other hand issue system events and actions scripted in the control panel script upon user action.
The control panel script, unlike other KiNOKO scripts, use XML. The structure of XML is similar to HTML form and JavaScript. Regular KiNOKO basic scripts can be used inside the <Action> tag, but some restrictions apply.
This script can be executed with the standard utility "kcmlcheck."
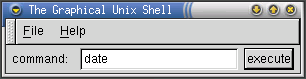
 1: <?xml version="1.0"?>
 2:
 3: <KinokoControlPanel label="The Graphical Unix Shell">
 4:
 5:     <Label label="command:"/>
 6:     <Entry name="command"/>
 7:     <Button label="execute" on_click="execute"/>
 8:
 9:     <action name="execute">
10:     <!--
11:         string command = lookupWidget("command").getValue();
12:         println("> " + command);
13:         system(command);
14:     //-->
15:     </action>
16:
17: </KinokoControlPanel>
When executed, the following window will be displayed. Type in an UNIX command and click the execute button to execute the command. To shutdown, choose File > eXit from the menu.
If a button that is not connected to local actions is clicked, the kinoko-control reports to the KinokoController all input widget values and the names of the buttons clicked. KinokoController records the input widget values to the registry (under /control), and issues a KCOM event with an event name of that button name. By the issuance of this event, the KCOM script on controller.XXX() is called and necessary process is done inside. Also the input field values can be obtained from the registry by getRegistry("control/field_name").
The following are parts of a KCML script and a KCOM script used in SmallKinoko. Here, the KCOM on controller.construct() is called upton clicking the [construct] button in the control panel, and within that script, the file names of the readout script, view script, and the data file name written in the input fields of the control panel are obtained through the registry.
    <EntryList>
        <Entry name="readout_script" label="ReadoutScript (.kts)" option="file_select"/>
        <Entry name="view_script" label="ViewScript (.kvs)" option="file_select"/>
        <Entry name="data_file" label="DataFile (.kdf)" option="file_select"/>
    </EntryList>

    <VSpace/>

    <Frame name="run_control" label="Run Control">
        <ButtonList>
            <Button name="construct" label="Construct" enabled_on="stream_ready system_ready"/>
            <Button name="start" label="Start" enabled_on="system_ready"/>
            <Button name="stop" label="Stop" enabled_on="data_taking"/>
            <Button name="clear" label="Clear" enabled_on="system_ready data_taking"/>
            <Button name="quit" label="Quit" enabled_on="stream_ready system_ready error"/>
        </ButtonList>
    </Frame>
on controller.construct()
{
    controller.changeState("constructing");

    ...(continues)

    string readout_script = getRegistry("control/readout_script");
    string view_script = getRegistry("control/view_script");
    string data_file = getRegistry("control/data_file");

    ...(continues)

    collector.setReadoutScript(readout_script);
    viewer.setViewScript(view_script);
    recorder.setDataFile(data_file);

    ..(continues)

    controller.changeState("stream_ready");
}
Data taken by TinyKinoko and SmallKinoko are saved in KDF (Kinoko Data Format) Format. This is a file that contains a lot of information, not just data but header, data discriptor, and so on in binary. These files can be converted to text files using the standard utilities kdfdump and kdftable. Also by using kdfprofile and kdfcheck, various setting at which the data was taken can be viewed such as scripts used at that time.
Here, we will discuss ways to view KDF files directly by using the C++ program instead of these conversion utilities.
There are several ways to view KDF files, but here we will discuss using the convenient DataAnalyzer framework, which does not heavily depend on details of data structure. DataAnalyzer is a total and convenient way to read data and is well suited in processing data taken from CAMAC ADCs in order.
On the other hand, DataAnalyzer is not so convenient for dealing with high level processing such as processing multiple data at the same time or performing general processing on data with unknown data structure. In these cases, we will use DataProcessor, which is mentioned in detals later.
In this datafile, only data from datasource CamacAdc is written and only section adc exits.
% kdfcheck trial01.kdf
% Preamble Version: 00010002
% Header Version: 00010001
% Data Area Version: 00010001
% Data Format Flags: 00000000

# Creator: tinykinoko
# DateTime: 2003-03-09 20:10:17 JST
# UserName: sanshiro
# Host: leno.awa.tohoku.ac.jp
# Directory: /home/sanshiro/work/kinoko/local/samples
# ScriptFile: CamacAdc.kts

[2269]--- 0, 308 bytes
Data Descriptor
    datasource "CamacAdc"<2269>
    {
        attribute creator = "tinykinoko";
        attribute creation_date = "2003-03-09 20:10:18 JST";
        attribute script_file = "CamacAdc.kts";
        attribute script_file_fingerprint = "6355550a";

        section "adc"<256>: indexed(address: int-16bit, data: int-16bit);
    }

...(continues)
The first thing to do is to create your own analyzer class by inheriting Kinoko's data analyzer framework's KinokoSectionDataAnalyzer class, and override the ProcessData() method.
Here all data from the file is displayed and at the end, the number of events is displayed. The -EventCount member is to count the number of events. Besides the overriding method, a constructor and distructor is needed.
#include "KinokoKdfReader.hh"
#include "KinokoSectionDataAnalyzer.hh"

class TMyDataAnalyzer: public TKinokoSectionDataAnalyzer {
  public:
    TMyDataAnalyzer(void);
    virtual ~TMyDataAnalyzer();
    virtual int ProcessData(TKinokoSectionData* SectionData) throw(TKinokoException);
  protected:
    int _EventCount;
};
Now we discuss the implementation of these methods.
Pass the data section name you want to read out to the parent class TKinokoSectionDataAnalyzer's constructor. By doing this, ProcessData() is called with the argument set as that section's data object. ProcessData() is called for every data packet.
static const char* SectionName = "adc";

TMyDataAnalyzer::TMyDataAnalyzer(void)
: TKinokoSectionDataAnalyzer(SectionName)
{
    _EventCount = 0;
}

TMyDataAnalyzer::~TMyDataAnalyzer()
{
    cout << endl;
    cout << _EventCount << " events were processed." << endl;
}

int TMyDataAnalyzer::ProcessData(TKinokoSectionData* SectionData) throw(TKinokoException)
{
    _EventCount++;

    int Address, Data;
    while (SectionData->GetNext(Address, Data)) {
	cout << Address << " " << Data << endl;
    }

    return 1;
}
Inside ProcessData(), GetNext() is called to readout data from that section data object and displayed. GetNext() will return false if there is nothing further to readout.
To finish up, create function main() and inside create an instance of the Kinoko file readout class TKinokoKdfReader and register your own Analyzer with RegisterAnalyzer(). Pass the datafile name as the argument to TKinokoKdfReader and the datasource name to RegisterAnalyzer(). If there is only one datasource in the datafile, like how this example has only one datasource, the datasource name can be left as a nullstring.
In order to compile this program, the Kinoko library must be linked. By using the standard utility kinoko-config, the necessary setting of libraries and include pathes will be automated. The following is an example of Makefile using kinoko-config.
static const char* DataSourceName = "";

int main(int argc, char** argv)
{
    if (argc < 2) {
	cerr << "Usage: " << argv[0] << " DataFileName" << endl;
        return EXIT_FAILURE;
    }
    string DataFileName = argv[1];

    TKinokoKdfReader* KdfReader = new TKinokoKdfReader(DataFileName);
    TKinokoDataAnalyzer* Analyzer = new TMyDataAnalyzer();

    try {
	KdfReader->RegisterAnalyzer(DataSourceName, Analyzer);
	KdfReader->Start();
    }
    catch (TKinokoException& e) {
	cerr << "ERROR: " << e << endl;
        return EXIT_FAILURE;
    }

    delete Analyzer;
    delete KdfReader;

    return 0;
}
Let's run this program.
As we did before, make your own analyzer class by inheriting KinokoSectionDataAnalyzer and override ProcessData(). In order to insert a line after each last event data, override ProcessTrailer() as well.
Next is implementing methods. Since this time we have multiple data sections to readout from, instead of indicating the section name at the constructor of TKinokoDataSectionAnalyzer like last time, use the AddSection() method as shown below. AddSection() returns the data section distinguishing SectionIndex, so this value will be saved in a member variable.
class TMyDataAnalyzer: public TKinokoSectionDataAnalyzer {
  public:
    TMyDataAnalyzer(void);
    virtual ~TMyDataAnalyzer();
    virtual int ProcessData(TKinokoSectionData* SectionData) throw(TKinokoException);
    virtual int ProcessTrailer(int TrailerValue) throw(TKinokoException);
  protected:
    int _AdcSectionIndex, _TdcSectionIndex;
};
In ProcessData(), the data object's section is distinguished by the SectionIndex acquired with AddSection().
ProcessTrailer() confirms that the trailer is an event trailer, and if it is, adds a blank line.
main() and Makefile will be the same as the last example.
TMyDataAnalyzer::TMyDataAnalyzer(void)
{
    _AdcSectionIndex = AddSection("adc");
    _TdcSectionIndex = AddSection("tdc");
}

TMyDataAnalyzer::~TMyDataAnalyzer()
{
}

int TMyDataAnalyzer::ProcessData(TKinokoSectionData* SectionData) throw(TKinokoException)
{
    const char* SectionName = "unknown";
    if (SectionData->SectionIndex() == _AdcSectionIndex) {
	SectionName = "adc";
    }
    else if (SectionData->SectionIndex() == _TdcSectionIndex) {
	SectionName = "tdc";
    }

    // if you only wanted to know the SectionName, the following way
    is possble too
    // string SectionName = SectionData->SectionName();

    int Address, Data;
    while (SectionData->GetNext(Address, Data)) {
	cout << SectionName << " " << Address << " " << Data << endl;
    }

    return 1;
}

int TMyDataAnalyzer::ProcessTrailer(int TrailerValue) throw(TKinokoException)
{
    if (TrailerValue == TKinokoDataStreamScanner::Trailer_Event) {
	cout << endl;
    }

    return 1;
}
Executing this program with data taken with CamacAdcTdc.kts will display the following.
There are not many differences in reading tagged section and indexed. The only difference is in ProcessData(), when using GetNext(), instead of using GetNext(int& Address, int& Data), GetNext(string& FieldName, int& Data) must be used.
static const char* SectionName = "adc";

int TMyDataAnalyzer::ProcessData(TKinokoSectionData* SectionData) throw(TKinokoException)
{
    string SectionName = SectionData->SectionName();

    string FieldName;
    int Data;
    while (SectionData->GetNext(FieldName, Data)) {
	cout << SectionName << FieldName << " " << Data << endl;
    }

    return 1;
}
The only difference here again is just what goes inside ProcessData(). To obtain the pointer that points to the data area from the section data object, use the GetDataBlock() method. The data block size can be obtained through the method DataBlockSize().
The following is an example of reading a data blcok and dumping it to display as hex.
Executing this program with data taken with CamacAdc.kts will give the follwoing.
int TMyDataAnalyzer::ProcessData(TKinokoSectionData* SectionData) throw(TKinokoException)
{
    void* DataBlock = SectionData->GetDataBlock();
    size_t DataBlockSize = SectionData->DataBlockSize();

    // hexadecimal dump //
    cout << "[" << SectionData->SectionName() << "]";
    cout << hex << setfill('0');
    for (unsigned Offset = 0; Offset < DataBlockSize; Offset++) {
	if (Offset % 16 == 0) {
	    cout << endl;
	    cout << setw(4) << Offset << ":  ";
	}
	else if (Offset % 8 == 0) {
	    cout << " ";
	}
	cout << setw(2) << (int) ((unsigned char*) DataBlock)[Offset] << " ";
    }
    cout << dec << setfill(' ') << endl;

    return 1;
}
As an example, we consider data readout by the following readout script.
The data readout with this script is the following.
on trigger(adc) {
    unit event {
        adc.read(#0..#3);
        tdc.read(#0..#3);
    }
}
As you can see, indexed type sections "adc" and "tdc" are in the nested type section "event".
% kdfcheck Trial04.kdf
% Preamble Version: 00010002
% Header Version: 00010001
% Data Area Version: 00010001
% Data Format Flags: 00000000

# Creator: tinykinoko
# DateTime: 2003-03-09 21:57:05 JST
# UserName: sanshiro
# Host: leno.awa.tohoku.ac.jp
# Directory: /home/sanshiro/work/kinoko/local/samples
# ScriptFile: CamacAdcTdc.kts

[2403]--- 0, 436 bytes
Data Descriptor
    datasource "CamacAdcTdc"<2403>
    {
        attribute creator = "tinykinoko";
        attribute creation_date = "2003-03-09 21:57:05 JST";
        attribute script_file = "CamacAdcTdc.kts";
        attribute script_file_fingerprint = "a3ca80e0";

        section "event"<256>: nested {
            section "adc"<256>: indexed(address: int-32bit, data: int-32bit);
            section "tdc"<257>: indexed(address: int-32bit, data: int-32bit);
        }
    }

...(continues)
To read data of this sort, the only change you need to make is to change the section name compatible with the nested type structure.
TMyDataAnalyzer::TMyDataAnalyzer(void)
{
    _AdcSectionIndex = AddSection("event:adc");
    _TdcSectionIndex = AddSection("event:tdc");
}
By calling TKinokoKdfReader::Start(), all control is passed to the framework side, and will not return until the program processes all data. Calling TKinokoKdfReader::ProcessNext() will perform the same processing as TKinokoKdfReader::Start(), but will return the control to the user program side after processing one packet, so by using this, a user can write loops to control this process in the user program. If an empty loop is written inside TKinokoKdfReader::ProcessNext() like the following, it would do the exact same process as TKinokoKdfReader::Start() (processing time will differ slightly).
Please be reminded that ProcessData() of the analyzer is NOT called for each ProcessNext() called. ProcessNext() would stop after processing one packet, but each packet includes data of other datasources and sections too.
while (KdfReader->ProcessNext()) {
    ;
}
Here is an example of a program where the data packet loop is on the user program side.
#include <cstdlib>
#include <iostream>
#include <string>
#include "KinokoKdfReader.hh"
#include "KinokoSectionDataAnalyzer.hh"

using namespace std;


// let us say there are 4 data elements in indexed type
section adc
static const char* DataSourceName = "";
static const char* SectionName = "adc";
static const int NumberOfDataElements = 4;


class TMyDataAnalyzer: public TKinokoSectionDataAnalyzer {
  public:
    TMyDataAnalyzer(TKinokoKdfReader* KdfReader);
    virtual ~TMyDataAnalyzer();
    virtual int ProcessData(TKinokoSectionData* SectionData) throw(TKinokoException);
    virtual bool GetData(const int*& Data);
  protected:
    TKinokoKdfReader* _KdfReader;
    int _DataBuffer[NumberOfDataElements];
    bool _IsDataAvailable;
};


TMyDataAnalyzer::TMyDataAnalyzer(TKinokoKdfReader* KdfReader)
: TKinokoSectionDataAnalyzer(SectionName)
{
    _KdfReader = KdfReader;
    _IsDataAvailable = false;
}

TMyDataAnalyzer::~TMyDataAnalyzer()
{
}

// here, data is read and stored in an internal buffer
int TMyDataAnalyzer::ProcessData(TKinokoSectionData* SectionData) throw(TKinokoException)
{
    int Address, Data;
    while (SectionData->GetNext(Address, Data)) {
	if (Address < NumberOfDataElements) {
	    _DataBuffer[Address] = Data;
	}
    }

    _IsDataAvailable = true;

    return 1;
}

// return data in internal buffer
bool TMyDataAnalyzer::GetData(const int*& Data)
{
    // read from file if there is no data
    while (! _IsDataAvailable) {
	if (! _KdfReader->ProcessNext()) {
	    return false;
	}
    }

    Data = _DataBuffer;
    _IsDataAvailable = false;

    return true;
}


int main(int argc, char** argv)
{
    if (argc < 2) {
	cerr << "Usage: " << argv[0] << " DataFileName" << endl;
        return EXIT_FAILURE;
    }
    string DataFileName = argv[1];

    TKinokoKdfReader* KdfReader = new TKinokoKdfReader(DataFileName);
    TMyDataAnalyzer* Analyzer = new TMyDataAnalyzer(KdfReader);

    try {
	KdfReader->RegisterAnalyzer(DataSourceName, Analyzer);

        // looping through data packets
	const int* Data;
	while (Analyzer->GetData(Data)) {
	    for (int i = 0; i < NumberOfDataElements; i++) {
		cout << i << " " << Data[i] << endl;
	    }
	    cout << endl;
	}
    }
    catch (TKinokoException& e) {
	cerr << "ERROR: " << e << endl;
        return EXIT_FAILURE;
    }

    delete Analyzer;
    delete KdfReader;

    return 0;
}
Further more, codes that use DataProcessor is easily unified as a component in online datastreams (DataProcessor was originally designed for this purpouse). Therefore, data processes that are scheduled to be online in the future or used both online and offline should use DataProcessor.
Since DataProcessor shows the contents of a datapacket directly to the user, dealing with indexed and tagged data in this framework is a little tricky, but for block type, it becomes rather simpler to use DataProcessor.
The following is a program that dupms all data packet's DataSourceId, SectionId, and data in the file in hex.
#include <iostream>
#include <iomanip>
#include "MushArgumentList.hh"
#include "KinokoDataProcessor.hh"
#include "KinokoStandaloneComponent.hh"

using namespace std;


class TMyDataConsumer: public TKinokoDataConsumer {
  public:
    TMyDataConsumer(void);
    virtual ~TMyDataConsumer();
    virtual void OnReceiveDataPacket(void* DataPacket, long PacketSize) throw(TKinokoException);
};


TMyDataConsumer::TMyDataConsumer(void)
{
}

TMyDataConsumer::~TMyDataConsumer()
{
}

void TMyDataConsumer::OnReceiveDataPacket(void* DataPacket, long PacketSize) throw(TKinokoException)
{
    // get DataSourceId and SectionId //
    int DataSourceId = TKinokoDataStreamScanner::DataSourceIdOf(DataPacket);
    int SectionId = TKinokoDataSectionScanner::SectionIdOf(DataPacket);

    // get data pointer and size //
    void* Data = TKinokoDataSectionScanner::DataAreaOf(DataPacket);
    size_t DataSize = TKinokoDataSectionScanner::DataSizeOf(DataPacket);

    // hex dump //
    cout << "[" << DataSourceId << ":" << SectionId << "]";
    cout << hex << setfill('0');
    for (unsigned Offset = 0; Offset < DataSize; Offset++) {
	if (Offset % 16 == 0) {
	    cout << endl;
	    cout << setw(4) << Offset << ":  ";
	}
	else if (Offset % 8 == 0) {
	    cout << " ";
	}
	cout << setw(2) << (int) ((unsigned char*) Data)[Offset] << " ";
    }
    cout << dec << setfill(' ') << endl;
}


int main(int argc, char** argv)
{
    TMushArgumentList ArgumentList(argc, argv);

    TMyDataConsumer MyDataConsumer;
    TKinokoStandaloneDataConsumer StandaloneDataConsumer(&MyDataConsumer, "MyDataConsumer");

    try {
	StandaloneDataConsumer.Start(ArgumentList);
    }
    catch (TKinokoException &e) {
	cerr << "ERROR: " << e << endl;
    }

    return 0;
}
First of al, inherit KinokoDataConsumer and create MyDataConsumer, then override OnReceiveDataPacket(). OnReceiveDataPacket() is a method called everytime a datapacket is received. The pointer to the datapacket itself and the datapacket size is passed as its argument.
To obtain DataSourceId from the datapacket, use TKinokoDataStreamScanner's static method DataSourceIdOf(). Similarly for SectionId, use TKinokoDataSectionScanne's SectionIdOf().
By using TKinokoDataSectionScanner, the pointer and data size of the data block inside teh packet can be obtained.
Create an instance to MyDataConsumer by the main() function of TMyDataConsumer, and connect with the system using TKinokoStandaloneDataConsumer. If you use TKinokoDataConsumerCom instead of TKinokoStandaloneDataConsumer, it becomes an online data analysis component. Just pass the program arguments (ArgumentList) to TKinokoStandaloneDataConsumer and call Start() and Kinoko will take care of the rest!
Compiling this program is basically the same as the DataAnalyzer case.
The parent class TKinokoDataConsumer of TMyDataConsumer has a data descriptor object _InputDataDescriptor, and data descriptor information can be obtained through this. Also TKinokoDataConsumer calls method OnRunBegin() upon recieving the RunBegin packet so this will be inherited and data descriptor processing will take place in here.
Class definitions are the following. Add method OnRunBegin() to make members hold datasource/section IDs of the packet being processed.
#include "KinokoDataSource.hh"
#include "KinokoDataSection.hh"

class TMyDataConsumer: public TKinokoDataConsumer {
  public:
    TMyDataConsumer(string DataSourceName, string SectionName);
    virtual ~TMyDataConsumer();
    virtual void OnRunBegin(void) throw(TKinokoException);
    virtual void OnReceiveDataPacket(void* DataPacket, long PacketSize) throw(TKinokoException);
  protected:
    string _DataSourceName, _SectionName;
    int _DataSourceId, _SectionId;
};
Receive the datasource/section ID names of the packet to process in the constructor. In DataSouceId and SectionId, negative values are put in to show that they are invalid.
TMyDataConsumer::TMyDataConsumer(string DataSourceName, string SectionName)
{
    _DataSourceName = DataSourceName;
    _SectionName = SectionName;

    _DataSourceId = -1;
    _SectionId = -1;
}
In the OnRunBegin() method, the parent class TKinokoDataConsumer holds the _DataDescriptor object and from that we obtain the DataSource object, and then from that DataSouce object, we obtain the DataSection object all in order to get each of their IDs.
void TMyDataConsumer::OnRunBegin(void) throw(TKinokoException)
{
    // obtain DataSource object from name //
    TKinokoDataSource* DataSource = _InputDataDescriptor->DataSource(_DataSourceName);

    if (DataSource != 0) {
	// obtain DataSourceId //
	_DataSourceId = DataSource->DataSourceId();

	// obtain DataSection from name //
	TKinokoDataSection* DataSection = DataSource->DataSection(_SectionName);

	if (DataSection != 0) {
	    // obtain SectionId //
	    _SectionId = DataSection->SectionId();
	}
    }
}
In OnReceiveDataPacket(), the DataSourceId/SectionId of the received packet are compared with the DataSouceId/SectionId held as identifiers of packets that should be processed. If they do not match, it will skip that packet and check the next.
void TMyDataConsumer::OnReceiveDataPacket(void* DataPacket, long PacketSize) throw(TKinokoException)
{
    // obtain packet's DataSourceId and compare //
    int DataSourceId = TKinokoDataStreamScanner::DataSourceIdOf(DataPacket);
    if (DataSourceId != _DataSourceId) {
	return;
    }

    // obtain packet's SectionId and compare //
    int SectionId = TKinokoDataSectionScanner::SectionIdOf(DataPacket);
    if (SectionId != _SectionId) {
	return;
    }

    ...(continues)
In the main() function, pass the name of the datasource and data section to be processed to MyDataConsumer.
int main(int argc, char** argv)
{
    TMyDataConsumer MyDataConsumer("CamacAdc", "adc");

    ...(continues)
TKinokoDataDescriptor is an object that has all the data written in the data discriptor. Basically it is a list of TKinokoDataSource which has information of each datasource. In TKinokoDataSource is yet another list of TKinokoDataSection, which holds all information regarding each section. The following methods are methods available in these classes.
- TKinokoDataSource* DataSource(long DataSourceId)
- searches for the datasource object from datasource ID and if found, returns the ID. If not, returns 0.
- TKinokoDataSource* DataSource(const std::string& DataSourceName)
- searches for the datasource object from datasource name, and if found, returns the name. If not, returns 0.
- const std::vector<TKinokoDataSource*>& DataSourceList(void)
- returns a list of all datasource objects held
- long DataSourceId(void) const
- returns datasource ID.
- const std::string& DataSourceName(void) const
- returns datasource name.
- TKinokoDataSection* DataSection(int SectionId)
- searches the data section object from section ID, and if found, returns the ID. If not, returns 0.
- TKinokoDataSection* DataSection(const std::string& SectionName)
- searches the data section object from section name, and if found, returns the name. If not, returns 0.
- bool GetAttributeOf(const std::string& Name, std::string& Value)
- obtains datasource attribute and puts it in Value. If the attribute is found, returns true, if not, returns false.
- int SectionType(void) const
- returns section type value. The following enum values are defined.
- TKinokoDataSection::SectionType_Indexed
- TKinokoDataSection::SectionType_Tagged
- TKinokoDataSection::SectionType_Block
- TKinokoDataSection::SectionType_Nested
- int SectionId(void) const
- returns section ID.
- const std::string& SectionName(void) const
- returns section name.
- TKinokoDataSource* DataSource(void) const
- returns the datasource object of the datasource that this section belongs to.
In the following example, a scanner object is received inside OnRunBegin() and used in OnReceiveDataPacket(). Scanner objects are deleted by the data section object that generated them so the user does not have to worry about deleting them.
#include "KinokoIndexedDataSection.hh"

class TMyDataConsumer: public TKinokoDataConsumer {
  public:
    TMyDataConsumer(string DataSourceName, string SectionName);
    virtual ~TMyDataConsumer();
    virtual void OnRunBegin(void) throw(TKinokoException);
    virtual void OnReceiveDataPacket(void* DataPacket, long PacketSize) throw(TKinokoException);
  protected:
    string _DataSourceName, _SectionName;
    int _DataSourceId, _SectionId;
    TKinokoIndexedDataSectionScanner* _Scanner;
};
void TMyDataConsumer::OnRunBegin(void) throw(TKinokoException)
{
    TKinokoDataSource* DataSource = _InputDataDescriptor->DataSource(_DataSourceName);
    if (DataSource != 0) {
	_DataSourceId = DataSource->DataSourceId();
	TKinokoDataSection* DataSection = DataSource->DataSection(_SectionName);

	if (DataSection != 0) {
	    _SectionId = DataSection->SectionId();

	    // confirm section type and obtain
	    scanner object //
	    if (DataSection->SectionType() != TKinokoDataSection::SectionType_Indexed) {
		throw TKinokoException("invalid section type");
	    }
	    _Scanner = ((TKinokoIndexedDataSection*) DataSection)->Scanner();
	}
    }
}
void TMyDataConsumer::OnReceiveDataPacket(void* DataPacket, long PacketSize) throw(TKinokoException)
{
    int DataSourceId = TKinokoDataStreamScanner::DataSourceIdOf(DataPacket);
    if (DataSourceId != _DataSourceId) {
	return;
    }

    int SectionId = TKinokoDataSectionScanner::SectionIdOf(DataPacket);
    if (SectionId != _SectionId) {
	return;
    }

    // take out data elements using scanner object //
    int NumberOfElements = _Scanner->NumberOfElements(DataPacket);
    int Address, Data;
    for (int Index = 0; Index < NumberOfElements; Index++) {
	_Scanner->ReadFrom(DataPacket, Index, Address, Data);
	cout << Address << " " << Data << endl;
    }
}
#include "KinokoTaggedDataSection.hh"

class TMyDataConsumer: public TKinokoDataConsumer {
  public:
    TMyDataConsumer(string DataSourceName, string SectionName);
    virtual ~TMyDataConsumer();
    virtual void OnRunBegin(void) throw(TKinokoException);
    virtual void OnReceiveDataPacket(void* DataPacket, long PacketSize) throw(TKinokoException);
  protected:
    string _DataSourceName, _SectionName;
    int _DataSourceId, _SectionId;
    TKinokoTaggedDataSection* _DataSection;
    TKinokoTaggedDataSectionScanner* _Scanner;
};
void TMyDataConsumer::OnRunBegin(void) throw(TKinokoException)
{
    TKinokoDataSource* DataSource = _InputDataDescriptor->DataSource(_DataSourceName);
    if (DataSource != 0) {
	_DataSourceId = DataSource->DataSourceId();
	TKinokoDataSection* DataSection = DataSource->DataSection(_SectionName);

	if (DataSection != 0) {
	    _SectionId = DataSection->SectionId();

	    // confirm section type and obtain
	    scan object //
	    // keep data section object itself
	    since it will be used later //
	    if (DataSection->SectionType() != TKinokoDataSection::SectionType_Tagged) {
		throw TKinokoException("invalid section type");
	    }
	    _DataSection = (TKinokoTaggedDataSection*) DataSection;
	    _Scanner = _DataSection->Scanner();
	}
    }
}
If the field name to be processed is known to begin with, obtaining FieldIndex in OnRunBegin() will make the process much faster.
void TMyDataConsumer::OnReceiveDataPacket(void* DataPacket, long PacketSize) throw(TKinokoException)
{
    int DataSourceId = TKinokoDataStreamScanner::DataSourceIdOf(DataPacket);
    if (DataSourceId != _DataSourceId) {
	return;
    }

    int SectionId = TKinokoDataSectionScanner::SectionIdOf(DataPacket);
    if (SectionId != _SectionId) {
	return;
    }

    // take out data elements by using scan object //
    // be aware that information regarding section
    structure is obtained through data section object //
    int NumberOfFields = _DataSection->NumberOfFields()
    int Data;
    for (int Index = 0; Index < NumberOfElements; Index++) {
        string FieldName = _DataSection->FieldNameOf(Index);
	_Scanner->ReadFrom(DataPacket, Index, Data);
	cout << FieldName << " " << Data << endl;
    }
}
Some of the methods available in TKinokoTaggedDataSetion are listed below.
void TMyDataConsumer::OnRunBegin(void) throw(TKinokoException)
{
    TKinokoDataSource* DataSource = _InputDataDescriptor->DataSource(_DataSourceName);
    if (DataSource != 0) {
	_DataSourceId = DataSource->DataSourceId();
	TKinokoDataSection* DataSection = DataSource->DataSection(_SectionName);

	if (DataSection != 0) {
	    _SectionId = DataSection->SectionId();

	    if (DataSection->SectionType() != TKinokoDataSection::SectionType_Tagged) {
		throw TKinokoException("invalid section type");
	    }
	    _DataSection = (TKinokoTaggedDataSection*) DataSection;
	    _Scanner = _DataSection->Scanner();

            // obtain FieldIndex from data section
            objects //
            _FieldIndex_1 = _DataSection->FieldIndexOf("monitor_1");
            _FieldIndex_2 = _DataSection->FieldIndexOf("monitor_2");
	}
    }
}

void TMyDataConsumer::OnReceiveDataPacket(void* DataPacket, long PacketSize) throw(TKinokoException)
{
    int DataSourceId = TKinokoDataStreamScanner::DataSourceIdOf(DataPacket);
    if (DataSourceId != _DataSourceId) {
	return;
    }

    int SectionId = TKinokoDataSectionScanner::SectionIdOf(DataPacket);
    if (SectionId != _SectionId) {
	return;
    }

    // indicate FieldIndex and obtain data element //
    int Data;
    _Scanner->ReadFrom(DataPacket, _FieldIndex_monitor1, Data);
    cout << "monitor_1: " << Data << endl;
    _Scanner->ReadFrom(DataPacket, _FieldIndex_monitor2, Data);
    cout << "monitor_2: " << Data << endl;
}
- bool HasField(const std::string& FieldName)
- returns true if a field with name FieldName exists and returns false if it does not
- int FieldIndexOf(const std::string& FieldName) throw(TKinokoException)
- returns the index of the field with name FieldName. If the field does not exist, throws TKinokoException.
- std::string FieldNameOf(int FieldIndex) throw(TKinokoException)
- returns the name of the field that has index FieldIndex. If the Index is out of range, it throws TKinokoException.
- int NumberOfFields(void)
- returns number of fields.