screenshot (large) (PNG 151kB)
| Quick Tour |
How To Use tinyKinoko
screenshot (large) (PNG 151kB)
% cd kinoko/local/samples
% tinykinoko-graphical
Readout Script (.kts): SimCamacAdc.kts Data File (.kdf): test01.kdf # of events: 1000
How To Use SmallKinoko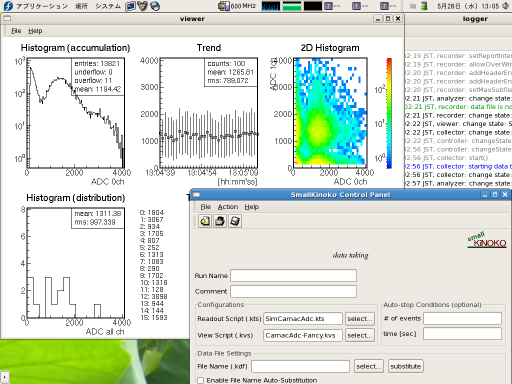
screenshot (large) (PNG 150kB)
% cd kinoko/local/samples
% smallkinoko
Readout Script (.kts): SimCamacAdc.kts View Script (.kvs): CamacAdc.kvs or
CamacAdc-Fancy.kvsData File (.kdf): (leave this field empty)
In this example, we use an RPC-022 CAMAC ADC (Rinei) with a CC/7x00 CAMAC controller (Toyo), and read the ADC data in ch-0, 1, 2, and 3. It is assumed that the ADC is installed in station 3, and that the ADC issues a LAM signal after the ADC receives a gate input.
Write a file with the following contents and save it as trial01.kts. The line numbers are for later explanation so do not include them.
Although the syntax has been slightly extended, it is basically similar to the syntax of C++, so C++ programmers should find it easy to understand. Details are described later in the Usage section.
 1: /* trial01.kts */
 2:
 3: datasource CamacAdc
 4: {
 5:     int station_number = 3;
 6:     long readout_channels = #0..#3;
 7:
 8:     CamacCrate crate;
 9:     CamacController controller("Toyo-CC7x00");
10:     CamacModule adc("Rinei-RPC022");
11:
12:     crate.installController(controller);
13:     crate.installModule(adc, station_number);
14:
15:     on trigger(adc) {
16:         adc.read(readout_channels);
17:         adc.clear();
18:     }
19: }
With the ktscheck utility, you can check for script errors.
Following the UNIX tradition, there will be no error messages if there aren't any. If there is an error, a message will appear with the line number (the following is an example of typing "Rinei-RPC220" instead of "Rinei-RPC022").% ktscheck Trial01.kts
Now that you have checked for errors, let's take data with this script. Start tinyKinoko as follows:%ktscheck Trial01.kts script exception: line 10: unknown camac module: Rinei-RPC220 %
The second argument is the output data file name, and the third is the number of events to be read out. Before starting the program, make sure that signals are fed into the ADC gate (if an adequate signal source is not available, use a 10Hz to 100Hz clock instead).% tinykinoko trial01.kts trial01.kdf 100
Is everything okay? If it works correctly, the data file trial01.kdf will be created. If an error message script exception appears, the script has errors: compare the script with the former example carefully. If the system froze without any messages, check the following things:
This command will generate an output like the following:% kdfdump trial01.kdf -
Lines that starts with the # character are comments. Data lines consists of the section name, address, and data, from left to right. In this example, the section name is a module name assigned in the readout script (line 10), and the address is the ADC channel. A blank line is inserted at the end of every event.# Creator: tinykinoko # DateTime: 2008-05-28 13:18:54 JST # UserName: sanshiro # Host: kinoko.awa.tohoku.ac.jp # Directory: /home/sanshiro/work/kinoko/local/trial01 # ScriptFile: Trial01.kts # EventTime: 1211948334 # EventTime: 1211948334 adc 0 1970 adc 1 1043 adc 2 1505 adc 3 339 # EventTime: 1211948334 adc 0 1216 adc 1 1411 adc 2 972 adc 3 183 adc 0 1521 adc 1 1510 adc 2 885 adc 3 1369 # EventTime: 1211948335 adc 0 173 adc 1 2022 adc 2 1016 adc 3 704 (lines omitted below)
By using the "kdftable" utility, the output can be put in a format that might be convenient for offline analysis. (However, some data types cannot be handled with the kdftable utility, such as Flash ADC and Multihit TDC. The only types that can be handled are ones where data structures for each events are fixed to a format that can be described as a table.)
% kdftable trial01.kdf -
If comment lines and blank lines are obstructive for your analysis, use the UNIX standard command "grep" to take them off.# Creator: tinykinoko # DateTime: 2008-05-28 13:18:54 JST # UserName: sanshiro # Host: kinoko.awa.tohoku.ac.jp # Directory: /home/sanshiro/work/kinoko/local/trial01 # ScriptFile: Trial01.kts # Fields: index time adc.0 adc.1 adc.2 adc.3 # StartTime: 1211948334 0 0 1970 1043 1505 339 1 0 1216 1411 972 183 2 1 1521 1510 885 1369 3 1 173 2022 1016 704 4 2 1632 1518 1075 1951 (lines omitted below)
% kdftable trial01.kdf | grep "^[0-9]"
0 0 1970 1043 1505 339
1 0 1216 1411 972 183
2 1 1521 1510 885 1369
3 1 173 2022 1016 704
4 2 1632 1518 1075 1951
(lines omitted below)
By using the "knt2root" utility, the output from the "kdftable" utility can be converted into a ROOT file.
or, alternatively, use pipe to bypass "knt" file generation.% kdftable trial01.kdf > trial01.knt % knt2root trial01.knt
The acquired data is stored in a ROOT TTree.% kdftable trial01.kdf | knt2root - trial01.root
% root trial01.root
root [1] _file0->ls();
TFile**       trial01.root
 TFile*       trial01.root
  KEY: TTree  CamacAdc;1      CamacAdc
  KEY: TTree  CamacAdc_propertyList;1	CamacAdc_propertyList
root [2] CamacAdc->Show(0);
======> EVENT:0
  index           = 0
  time            = 0
  adc.0           = 1970
  adc.1           = 1043
  adc.2           = 1505
  adc.3           = 339
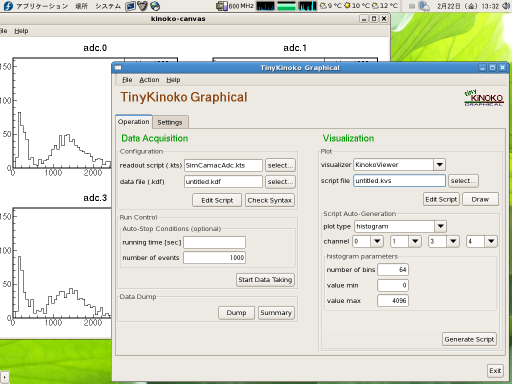
screenshot (PNG 151kB)To acquire data, set fields such as the file name in the Configuration section, and click the [start] button in the Acquisition section. A new terminal window opens and a "tinykinoko" process runs on it. The acquisition can be stopped by typing Ctrl-C on the terminal window.
The acquired data can be displayed by clicking the [Dump] button. By clicking the [Summary] button, some statistical information will be displayed such as event numbers for each channel and their average.
tinyKinoko-graphical will generate scripts by setting the script file name and clicking the Generate Script button in the "Script Auto-Generation" section. Parameters in the plot section must be set prior to script generation. Click Draw to launch KinokoViewer/ROOT and execute the script. Selecting KinokoViewer or ROOT can be done in the Setting tab page.
The "kdftable" utility is used internally in the interface with ROOT. Therefore, these functions can only be used if the acquired data can be handled by "kdftable." KinokoViewer does not have this limitation.
Using SmallKinoko
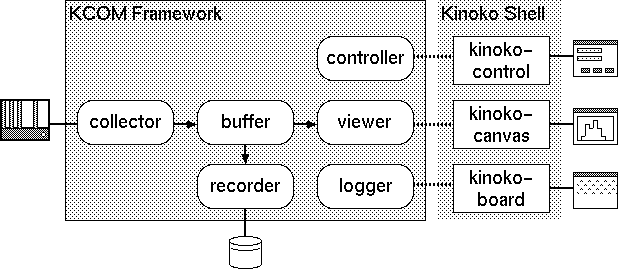
"SmallKinoko" is a multi-process DAQ system that works on a single PC. The system consists of several components: a Collector (hardware front-end), Buffer (shared memory manager), Viewer (real-time data display), Recorder (storage interface), Logger, and Controller. The components Controller, Logger and Viewer have a communication channel for user-interfaces (KinokoShell). These channels are connected to kinoko-control, kinoko-board and kinoko-canvas respectively.
Prior to using the system, you need to write a view script that the Viewer component uses. Make a file with the following contents and save it as trial01.kvs. Make sure the extension is .kvs, not .kts. You can also use tinykinoko-graphical to generate a template view script as described in a previous section.
Details of this script will be described later in the section Usage.
 1: /* Trial01.kvs */
 2:
 3: display CamacAdc
 4: {
 5:     Histogram histogram_adc_01("ADC ch 01", 128, 0, 4096);
 6:     History history_adc_01("ADC ch 01", 0, 4096, 32);
 7:     Histogram histogram_adc_all("ADC all channels", 128, 0, 4096);
 8:     Tabular tabular_adc_all("ADC values");
 9:
10:     analysis ("Trial01") {
11:         DataElement adc_01("adc", 1);
12:         DataElement adc_all("adc");
13:
14:         histogram_adc_01.fill(adc_01);
15:         history_adc_01.fill(adc_01);
16:         histogram_adc_all.fillOne(adc_all);
17:         tabular_adc_all.fillOne(adc_all);
18:     }
19:
20:     on every (1sec) {
21:         histogram_adc_01.draw();
22:         history_adc_01.draw();
23:         histogram_adc_all.draw();
24:         tabular_adc_all.draw();
25:     }
26: }
The utility that checks the view script is kvscheck. Like ktscheck, it will not display anything if there aren't any errors.
Using the "kinoko-viewer" utility with a test data file (use tinykinoko to make it), you can check the drawing.
% kinoko-viewer trial01.kdf Trial01.kvs | kinoko-canvas
After preparing the script, start the launcher smallkinoko as follows:
Several windows will appear with [SmallKinoko Control Panel], [logger], and [viewer] written on the title bars. Each of these is the window corresponding to the KinokoShells connected to components Controller, Logger, and Viewer.% smallkinoko
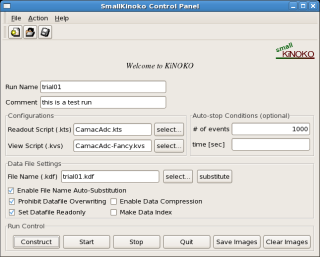
screenshot (large) (PNG 150kB)Enter the following to each field in the control panel window.
Readout Script (.kts): Trial01.kts View Script (.kvs): Trial01.kvs Data File (.kdf): Trial01.kdf
Then, click on the [construct] button in the control panel. Each component will read the script and build datastreams. Log messages outputted by the components will appear on the logger window. Here's an example of what it will look like.
The first column is "log level", which has the following classifications:N 05 Mar 2001 06:35:13 JST, collector: change state: ComponentReady N 05 Mar 2001 06:35:14 JST, recorder: change state: ComponentReady N 05 Mar 2001 06:35:14 JST, viewer: change state: ComponentReady N 05 Mar 2001 06:35:14 JST, buffer: change state: Constructing N 05 Mar 2001 06:35:15 JST, buffer: change state: DataTaking D 05 Mar 2001 06:39:16 JST, collector: setReadoutScript(): trial01.kts D 05 Mar 2001 06:39:16 JST, viewer: setViewScript(): trial01.kvs D 05 Mar 2001 06:39:16 JST, recorder: setDataFile(): smallkinoko.kdf D 05 Mar 2001 06:39:17 JST, collector: setSink: buffer (buffer) @127.0.0.1, shm: 100, msg: 101 D 05 Mar 2001 06:39:18 JST, recorder: setSource(): buffer (buffer) @127.0.0.1, shm: 100, msg: 101 D 05 Mar 2001 06:39:19 JST, viewer: setSource(): buffer (buffer) @127.0.0.1, shm: 100, msg: 101 N 05 Mar 2001 06:39:19 JST, collector: change state: Connecting D 05 Mar 2001 06:39:19 JST, collector: connecting sink... D 05 Mar 2001 06:39:20 JST, collector: connected (lines omitted below)
If error or panic occurs, shut down the system by clicking the [quit] button. Most errors are caused by script errors.
D: Debug ignore it N: Notice might be interesting R: Remarkable supernova explosions and such W: Warning data might have problems (but not execution) E: Error unable to continue executing P: Panic unable to continue executing, unable to terminate; garbage is left on the system which will need to be removed before the next execution
If everything goes well, start data acquisition by clicking the [start] button. The histograms will be updated every second, and you can watch your kinoko grow!
screenshot (PNG 28kB)When you get bored, click [stop] and then [quit] to shut down the system. The shutdown process takes a few seconds after clicking [quit]. Do not Ctrl-c before the prompt returns to a terminal and the shutdown process is complete.
screenshot (large) (PNG 50kB)
The RunName and Comment are recorded in the header of the datafile. The header can be displayed with kdfdump, etc.
screenshot (large) (PNG 48kB)
If you specify the "#-of-events" and/or "time" on the [auto-stop conditions], the run will stop automatically at that certain number of events or after that certain amount of time passes. If you don't want to use this function, simply leave the fields blank.
By clicking the "[substitute]" button on the [Data File Setting], special symbols in the data file name will be substituted as follows:
run-#.kdf --> run-#1.kdf
run-#0100.kdf --> run-#0101.kdf
run-$d.kdf --> run-$d051207.kdf    (7th December 2005)
run-$d051206.kdf --> run-$d051207.kdf
run-$t.kdf --> run-$t092311.kdf    (9h,23m,11s)
run-$t092311.kdf --> run-$t092543.kdf
By choosing "Enable File Name Auto-Substitution", this substitution will be automatically done on every [Construct].
The "Prohibit Datafile Overwriting" option under the [Data File Settings] disables the overwriting of datafiles. A pop-up window will appear if you specify data file names that already exist, but if this option is chosen, even if you choose to overwrite on the pop-up, it will produce an error and not let you overwrite.
If you choose "Set Datafile Readonly," the data file composed in this run will be set to a read-only attribute (444: -r--r--r--). Kinoko does not change a file's attribute in any case so the file will be protected at the system level.
By choosing "Enable Data Compression," a file will be compressed using zlib. The file becomes significantly smaller, but you cannot use some functions such as random accessing.
By choosing "Make Data Index," an index file will be made separately and random access using this will be available. Choosing this option regularly isn't thought to be necessary however (an index file can be created later).
All these options mentioned above have to be configured prior to clicking the [construct] button.
Web-Kinoko
% smallkinoko --webroot=$HOME/public_html/webkinoko
Running Apache is required. CGI execution needs to be permitted under the webkinoko directories. Use it only inside a firewall. Tested with FireFox, Safari and Opera. Internet Explorer is not suppoerted.
Deploying a DAQ process on a remote computer
% smallkinoko --daqhost=daq-host-name
Identical Kinoko installation is necessary on the remote host. Remote shell (ssh) needs to be configured so that no password typing is required on login to the remote host.
Autopilot
% smallkinoko autopilot-script.kcms
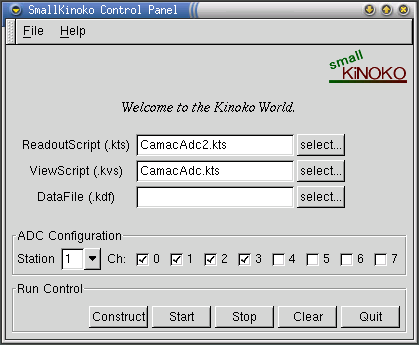
The control panel configuration is scripted by a control panel script (KCML script). This, unlike the ones we have discussed, uses an XML script. Here we will customize our control panel using the control panel script used in SmallKinoko as our basic script. Copy the SmallKinoko script (and the images used) to your working directory like the following.
Edit "Trial02.kcml" like the following. The bold lines are the ones you need to add.% cp $KINOKO_ROOT/scripts/SmallKinoko.kcml ./Trial02.kcml % cp $KINOKO_ROOT/scripts/SmallKinoko.xpm .
You can confirm how the control panel this script makes will look like using "kcmlcheck".
<?xml version="1.0"?>

<KinokoControlPanel label="SmallKinoko Control Panel">
  <HSpace/><Image file="SmallKinoko.xpm"/>
  <VSpace/>

  <HSpace/><Label name="message" label="Welcome to the Kinoko World." font="times-italic" size="14"/><HSpace/>
  <VSpace/>

  <EntryList>
    <Entry name="readout_script" label="ReadoutScript (.kts)" option="file_select"/>
    <Entry name="view_script" label="ViewScript (.kvs)" option="file_select"/>
    <Entry name="data_file" label="DataFile (.kdf)" option="file_select"/>
    </EntryList>
  <VSpace/>

  <Frame label="ADC Configuration">
    <Entry name="station" label="Station" width="40" selection="1 2 3 4"/>
    <Label label="Ch: "/>
    <RadioButton name="enable_ch0" label="0"/>
    <RadioButton name="enable_ch1" label="1"/>
    <RadioButton name="enable_ch2" label="2"/>
    <RadioButton name="enable_ch3" label="3"/>
    <RadioButton name="enable_ch4" label="4"/>
    <RadioButton name="enable_ch5" label="5"/>
    <RadioButton name="enable_ch6" label="6"/>
    <RadioButton name="enable_ch7" label="7"/>
  </Frame>
  <NewLine/>

  <Frame name="run_control" label="Run Control">
    <ButtonList>
      <Button name="construct" label="Construct" enabled_on="stream_ready system_ready"/>
      <Button name="start" label="Start" enabled_on="system_ready"/>
      <Button name="stop" label="Stop" enabled_on="data_taking"/>
      <Button name="clear" label="Clear" enabled_on="system_ready data_taking"/>
      <Button name="quit" label="Quit" enabled_on="stream_ready system_ready error"/>
    </ButtonList>
  </Frame>
</KinokoControlPanel>
Next, we configure the readout script so that it acquires the values set in the control panel to use them. In Trial01.kts, delete the lines that hard-code the station number and channels (lines 5 and 6) and add the following bold parts. The "getRegistry()" function grabs the parameters set in the control panel.% kcmlcheck Trial02.kcml
Use the KCML file we made previously as the argument and launch SmallKinoko. This should launch a SmallKinoko with the customized control panel that we just made.
 1: /* Trial02.kts */
 2:
 3: datasource Trial02
 4: {
 5:     int station = getRegistry("control/station");
 6:     int readout_channels;
 7:     for (int ch = 0; ch < 16; ch++) {
 8:         if (getRegistry("control/enable_ch" + ch) == "1") {
 9:             readout_channels += 0x0001 << ch;
10:         }
11:     }
12:
13:     CamacCrate crate;
14:     CamacController controller("Toyo-CC7x00");
15:     CamacModule adc("Rinei-RPC022");
16:
17:     crate.installController(controller);
18:     crate.installModule(adc, station_number);
19:
20:     on trigger(adc) {
21:         adc.read(readout_channels);
22:         adc.clear();
23:     }
24: }
Don't forget to change the "ReadoutScript" to "Trial02.kts" before clicking [construct].% smallkinoko Trial02.kcml
Usually message queues are used only by Kinoko. If other system are using message queues, Kinoko's queues can be identified by their owner (you) and permissions (600). To delete the message queue, use the ipcrm command with "msg [id]".% ipcs ------ Message Queues -------- key msqid owner perms used-bytes messages 0x01039817 128 sanshiro 600 0 0 0x6503802e 129 sanshiro 600 0 0
When the message queues are deleted, most kinoko processes will exit with error messages.% ipcrm msg 128 % ipcrm msg 129
If you use a desktop-environment such as GNOME, a lot of shared memory segments are used. The shared memory segment used by Kinoko can be identified by its owner (you), permissions (600), and size (33554432). To delete the shared memory segment, use the ipcrm command with "shm [id]".% ipcs ------ Shared Memory Segments -------- key shmid owner perms bytes nattch status 0x5b037c7f 3 root 644 1048576 0 dest 0x00000000 260 root 644 98304 16 dest 0x00000000 1157 sanshiro 777 65536 2 dest 0x00000000 1158 sanshiro 777 65536 2 dest 0x00000000 1159 sanshiro 777 65536 2 dest (lines omitted) 0x00000000 71365 sanshiro 777 65536 2 dest 0x00000000 71366 sanshiro 777 65536 2 dest 0x6403802e 73159 sanshiro 600 33554432 4 (lines omitted below)
% ipcrm shm 73159
Note that inoko is used as the grep match keyword instead of kinoko or Kinoko: this is because the process names might be either Kinoko-something or kinoko-something. Use the kill command to delete these processes.% ps -ef | grep inoko sanshiro 1259 1 0 06:34 ttyp2 00:00:00 wish /home/sanshiro/work/kinoko/bin/kinoko-control-panel leno.awa.tohoku.ac.jp 10001 sanshiro 1273 1 0 06:34 ttyp2 00:00:00 KinokoController-kcom controller port: 10002 sanshiro 1277 1 0 06:35 ttyp2 00:00:00 KinokoCollector-kcom collector file: smallkinoko.log sanshiro 1303 1285 0 07:23 ttyp5 00:00:00 grep inoko
In the Kinoko utilities, there is a simple script killgrep that performs searches with grep and kills the processes found all at once. By using this the processes shown above can be taken care of like the following.% kill 1259 % kill 1273 % kill 1277
Also check kcom and korb as the grep keyword. It is possible that the following processes are still running.% killgrep inoko sanshiro 1259 1 0 06:34 ttyp2 00:00:00 wish /home/sanshiro/work/kinoko/bin/kinoko-control-panel shimeji.awa.tohoku.ac.jp 10001 sanshiro 1273 1 0 06:34 ttyp2 00:00:00 KinokoController-kcom controller port: 10002 sanshiro 1277 1 0 06:35 ttyp2 00:00:00 KinokoCollector-kcom collector file: smallkinoko.log commit? (y/n) > y kill 1259 kill 1273 kill 1277 %
kcom-manager
kcom-registry-server
korb-broker
korb-nameserver